Food Security TEP User Manual
The following pages provide the user manual for the FS TEP platform.
You may also find it useful to refer to
The list of Frequently Asked Questions.
The list of Known issues.
If none of these pages answer your question, then please contact FS TEP support at support@foodsecurity.net.
1. Getting Started
1.1. Accessing FS TEP
The FS TEP portal can be accessed from the FS TEP homepage at https://foodsecurity-tep.net
It can also be accessed directly via the URL https://foodsecurity-tep.net/app
Upon accessing this URL, you will be asked to log in with your FSTEP ID. If you do not have an account with us, then you can request registration by email (support@foodsecurity-tep.net) or by leaving a message here: https://foodsecurity-tep.net/content/contact
1.2. Platform Overview
Once logged in, you will see the following view.
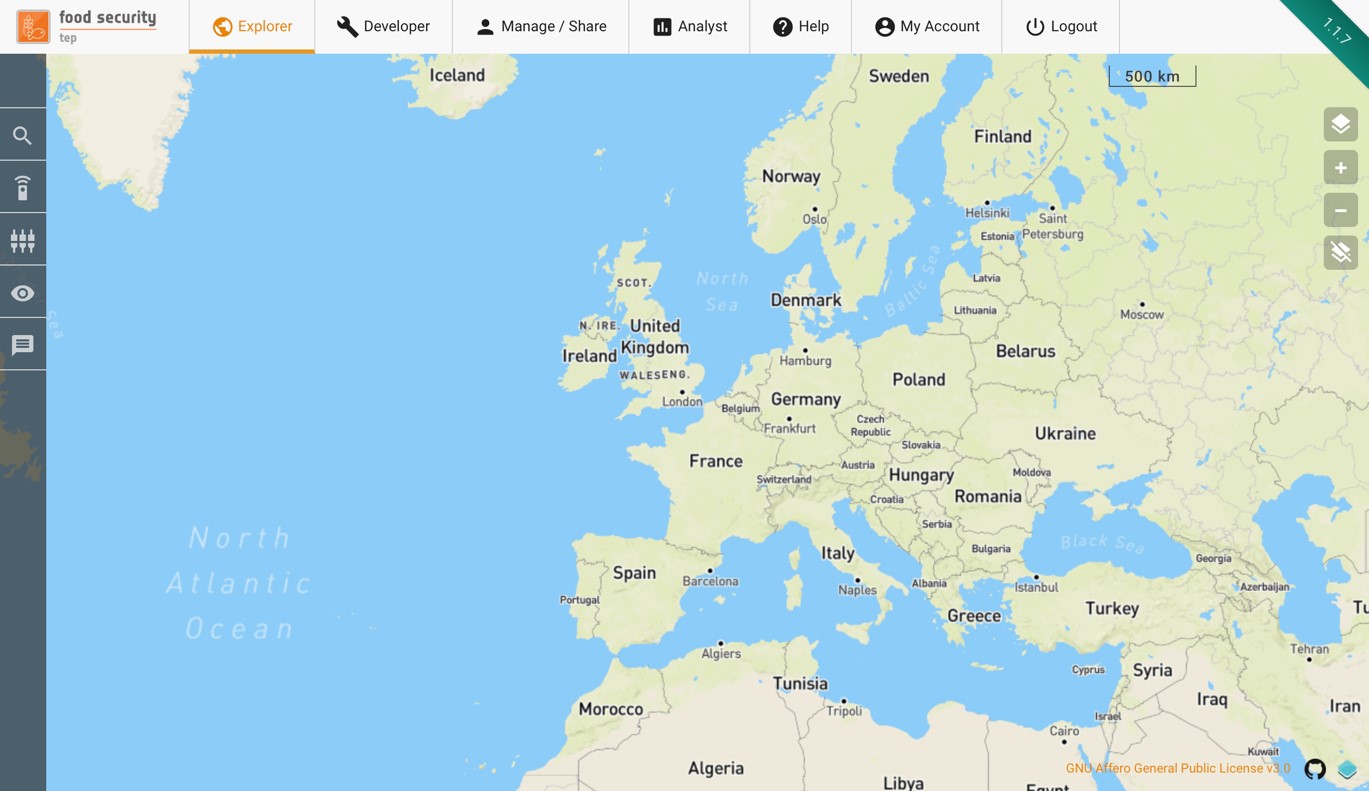
Across the top are several tabs, which give access to the different functionalities of the platform:
The Explorer tab allows users to search for available data and services, to run services and see the outputs, and to track the status of their jobs. See Exploring Data and Services.
The Developer tab (only visible to advanced users) allows development of new services on the platform. See Service Development.
The Manage/Share tab allows a user to control who has access to any data, services or uploaded files that they own. See Managing and Sharing.
The Analyst tab allows a user to view selected data sets on using an advanced (mobile friendly) GUI. See Analyst View.
The Help tab gives links to the website help pages and to this user manual.
The My Account tab allows a user to see their account details and transaction history, and gives a link for requesting additional TEP coins. See My Account.
Also along the top are a link to the main website (click on the logo) and a button to log out.
There is also a menu along the left side of the screen, which varies according to the tab selected.
1.3. Key Concepts
The following key concepts are used throughout this user manual:
A Databasket is a logical grouping of satellite products and/or FS TEP products and/or reference data held together for a particular purpose. A Databasket is identified by a name and a description. Users can view and manage their Databaskets either within the Data Panel or the Manage & Share interface
A Group is a collection of users with a common interest. Groups allow users to both communicate and share material within a selected number of peers. They are managed via the Manage & Share interface
A Service is a data processing or visualisation application or workflows made available to the users
A Job is a specific data processing activity that has been instigated by the user. Clicking on the Jobs section of the Data Panel allows users to explore Job status. If it has multiple input products then a job may also be comprised of several subjobs.
A Collection is a group of data grouped together due to their common nature. For example the set of all outputs of a given service would typically be grouped as a Collection.
2. Exploring Data and Services
2.1. The Explorer tab
The explorer tab allows users to search for data and for available services, then to select a service to be run on the data. The figure below shows an overview of the explorer tab.
Down the left hand side is a menu containing the following symbols
 Brings up a panel allowing users to search for data. This can be satellite data, reference data or products already processed on the FS TEP. See Searching for data.
 Brings up a panel allowing user to search for available services that can be run on the data. See Using Services.
 Brings up a panel showing the workspace (control panel) for the selected service. See screenshot.
 Brings up the data panel (see below), allowing a user to see key information. If the panel is already visible then pressing this symbol will hide it.
 Shows a count of the number of unread messages. Clicking on it will open the data panel at the messages tab.
At the bottom of the explorer tab the data panel can be made to appear. This shows the user
Results of data searches, as described in Searching for data.
Databaskets, as described in section Using Databaskets.
Status of jobs, as described in section Using Jobs.
System messages to the user.
The data panel can be closed by clicking on the “Close” button in the top right, or can be expanded by clicking on the “Expand Button”.
The remainder of the explorer tab shows the geobrowser, which can be used to select areas, to see product footprints and to view previews of some types of products.
2.2. Searching for data
2.2.1. Search Panel Overview
Selecting the Search panel in the Explorer tab allows users to browse the data contained in FS TEP.
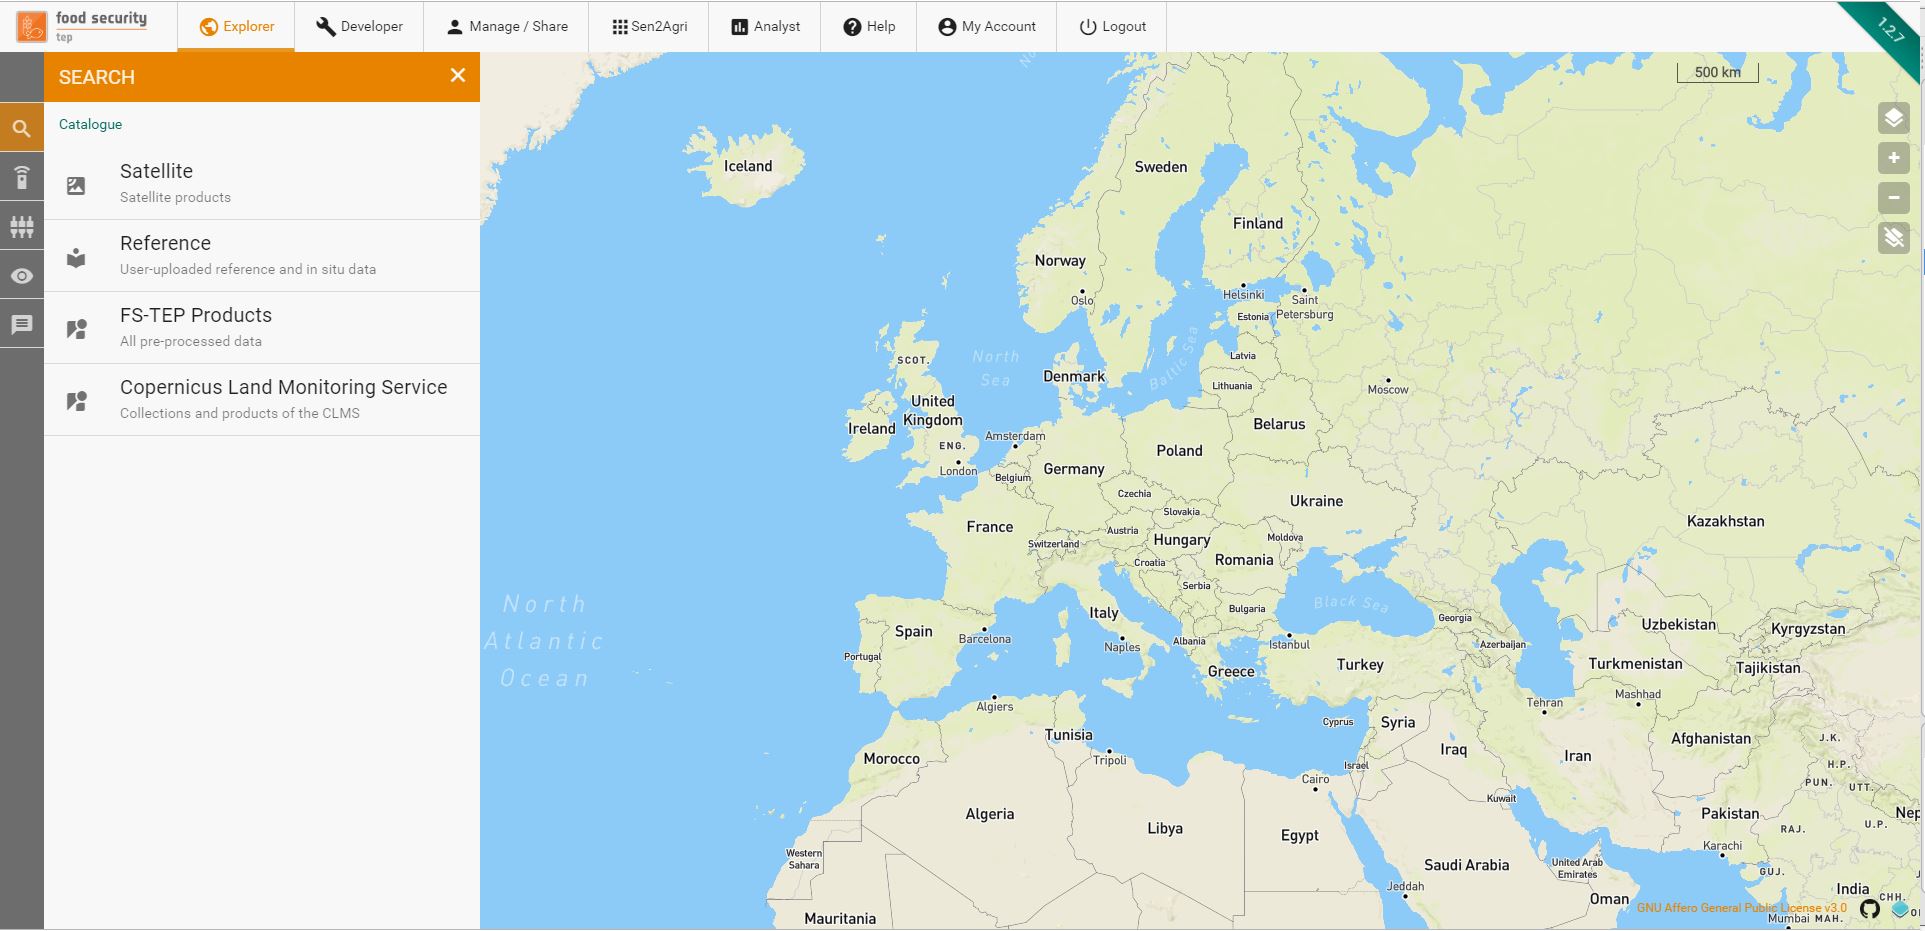
This is divided into four groups:
Satellite data, containing the various satellite data available to all users
Reference data, containing reference and in situ data uploaded by users of the platform
FS TEP products, containing outputs of services already run on the FS TEP platform.
Copernicus Land Monitoring Service, containing all the collections available in the Copernicus Land Monitoring Service, to which the FS TEP is connected.
Satellite data and Copernicus Land Monitoring Service are visible to all users, but reference data and FS TEP products are only visible if the owner has chosen to share them: see Managing and Sharing for more details on sharing.
2.2.2. Searching for Satellite Data
Satellite data can be searched for using the following parameters:
Collection – the top level grouping by satellite (Sentinel-1, Sentinel-2, etc.)
Product date (optional) – the acquisition date of the product.
AOI – this can be drawn directly on the geobrowser (as box or polygon), or using a previously saved are, or by importing a shapefile.
Identifier (optional) – a string identifying the product
Depending on the satellite chosen, some of the following parameters will also appear:
Platform – select individual spacecraft within an overall platform.
Product type – a menu whose entries depends on the satellite chosen.
Orbit direction – ascending or descending, or leave blank for both.
Cloud coverage – maximum cloud coverage for optical imagery.
Satellite products are visible to all users by default.
2.2.3. Searching for Reference Data
Reference data includes user uploaded reference and in situ data. These can be searched according to the following criteria:
Owner – the SSO ID of the owner of the product. Leave blank if not known.
Product date (optional) – the date at which the data is valid, e.g. the measurement data for an in situ measurement.
Publication date (optional) – the date when this data was uploaded to the FSTEP platform.
AOI - this can be drawn directly on the geobrowser (as box or polygon), or using a previously saved are, or by importing a shapefile.
Identifier (optional) – a string identifying the product
Note that only data which have been made visible by their owner will appear in the search.
2.2.4. Searching for FS TEP products
These are products which have already been processed on the FS TEP platform. They can be searched for according to the following criteria:
Collection – the collection in which the outputs have been grouped. This appears as a drop down menu with a default value of the top level collection of all FSTEP outputs.
Owner – the SSO ID of the owner of the product. Leave blank if not known.
Product date (optional) – the date at which the data is valid, e.g. the measurement data for an in situ measurement.
Job date (optional) – the date when this data was processed by the FSTEP platform.
AOI - this can be drawn directly on the geobrowser (as box or polygon), or using a previously saved are, or by importing a shapefile.
Identifier (optional) – a string identifying the product
Note that only products which have been made visible by their owner will appear in the search.
2.2.5. Searching for Copernicus Land Monitoring Service
These are products available on the Copernicus Land Monitoring Service (CLMS). They can be searched for according to the following criteria:
Collection – the collection in which the products have been grouped. This appears as a drop down menu with all the CLMS collections.
Product date (optional) – the date at which the data is valid, e.g. the measurement data for an in situ measurement.
AOI - this can be drawn directly on the geobrowser (as box or polygon), or using a previously saved are, or by importing a shapefile. Note: The AOI will be converted to a bounding box that will be used for subsetting the CLMS product.
Identifier (optional) – a string identifying the product
2.2.6. Viewing Search Results
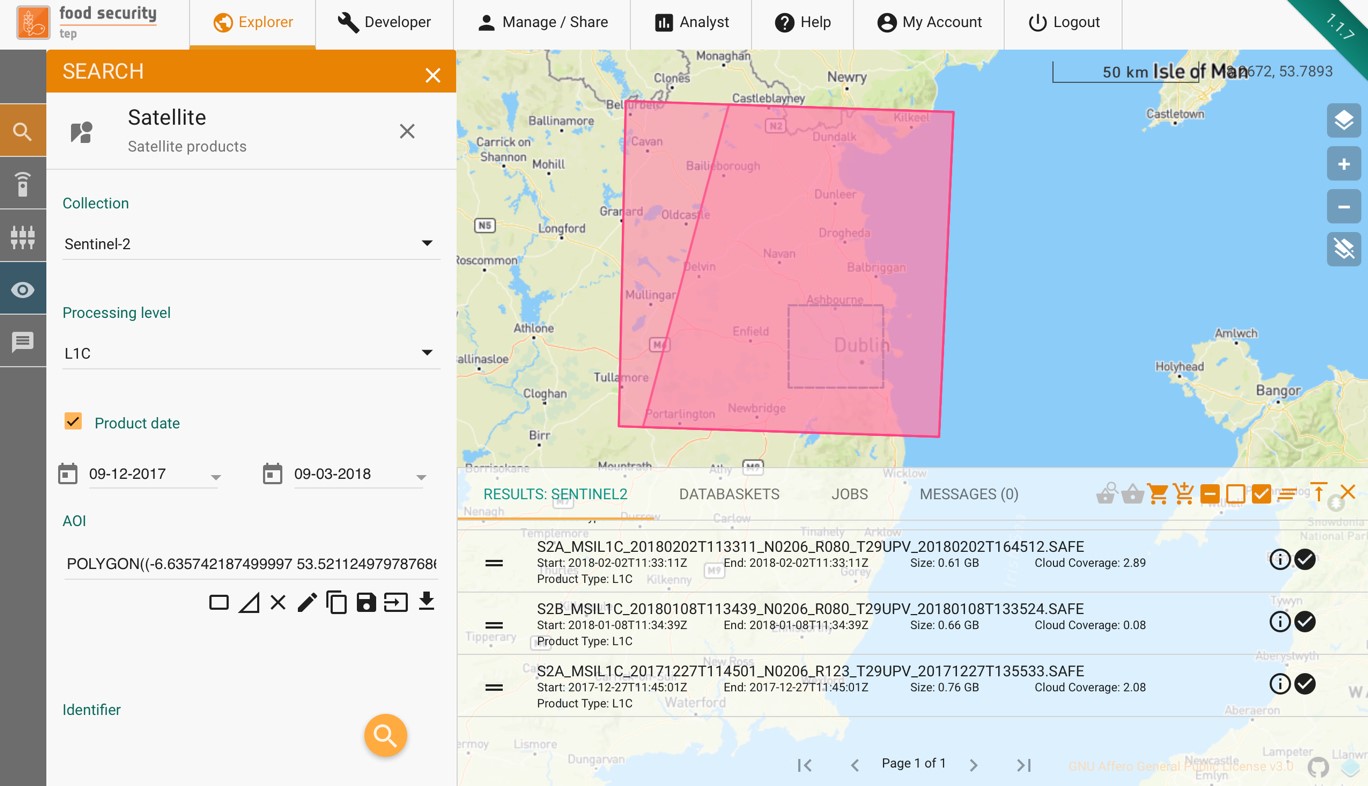
An example search for Sentinel 2 data is shown below.

Once the criteria have been set, clicking on the  symbol will start the search. The results will be shown in the data panel as shown below. Selecting a product in the list will highlight its footprint in the geobrowser.
The outputs of a search can be used directly as inputs to a service (see Using Services), or else they can be added to a databasket, as described in the next section.
2.3. Using Databaskets
A databasket is a collection of products, usually from a search result. They allow results to be grouped for processing together of for sharing with other users.
Databaskets can be created directly from the outputs of a search result, using the following symbols along the top of the data panel:
 Adds all search results to the selected databasket
 Adds only the selected items to the selected databasket
 Allows a user to select one of the existing databaskets
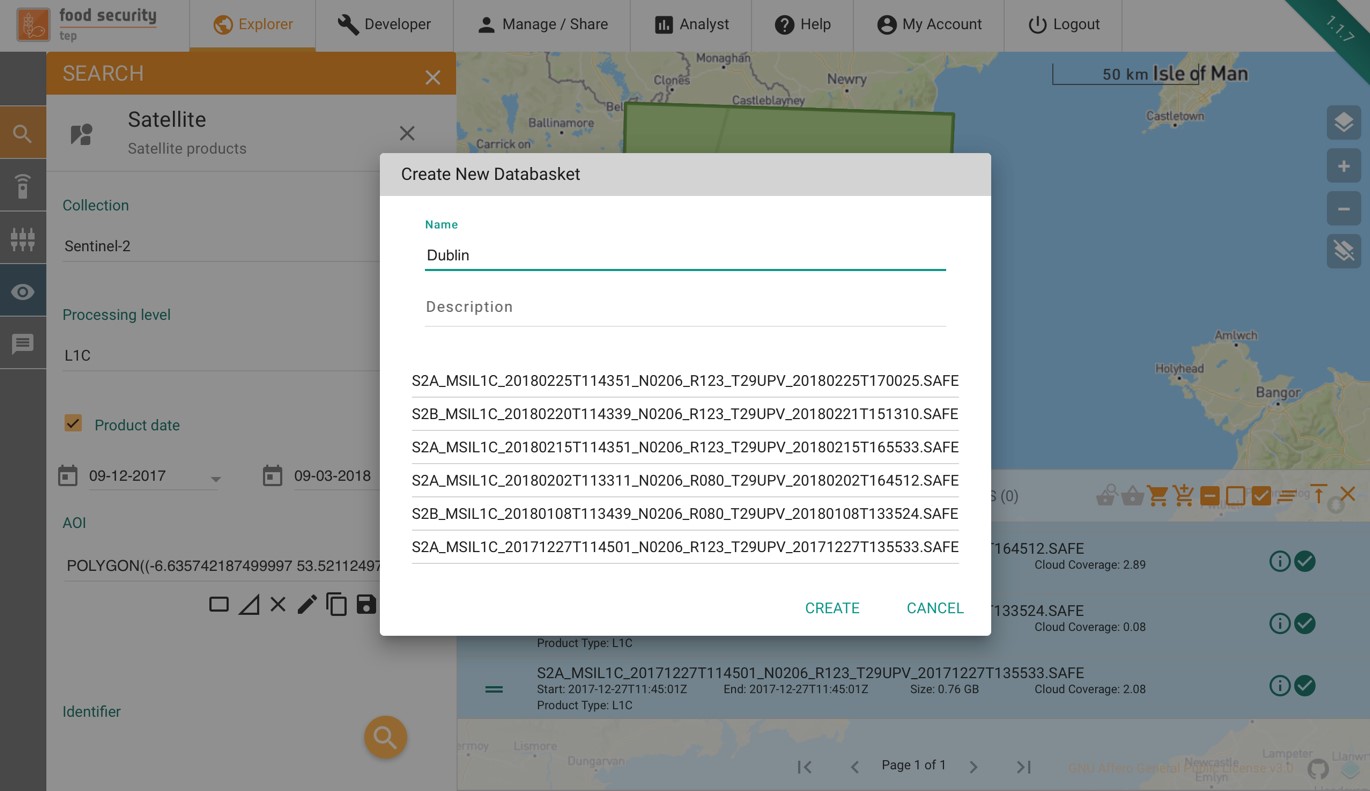
 Creates a new databasket, as shown in the figure below
Databaskets can be managed from the databasket tab of the data panel. By selecting the appropriate symbol the user can:
Add a new databasket
 Clear all products in a databasket
 Edit the name and description of a databasket
 Share a databasket - see Managing Databaskets
 Creates a new copy of a databasket
 Show the product footprints on the geobrowser map
 Open the databasket in the manage/share interface - see Managing Databaskets
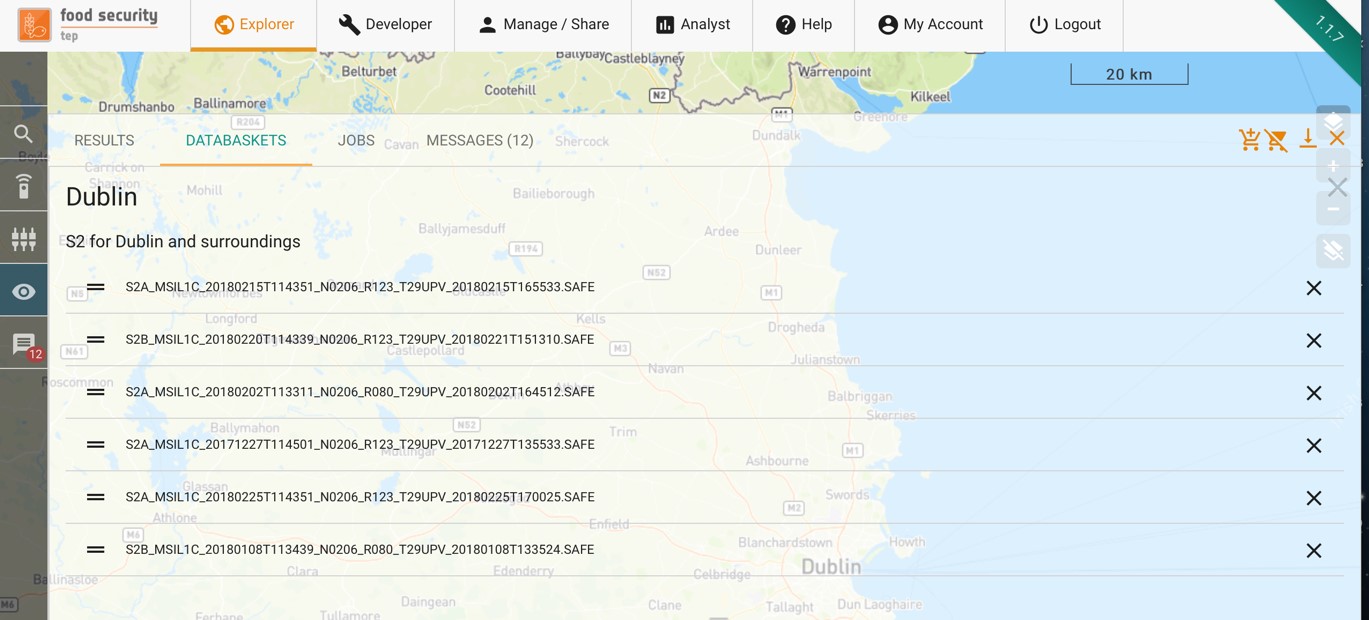
The user can also double click on a databasket to see a list of the products in that databasket, and to remove individual products, as in the figure below:
2.4. Using Services
2.4.1. Searching for a Service
To search for available services, click on the symbol on the left hand menu of the explorer tab.
This will give a list of all of the services that the user has access to, both their own or those that have been shared by other users, as shown below.
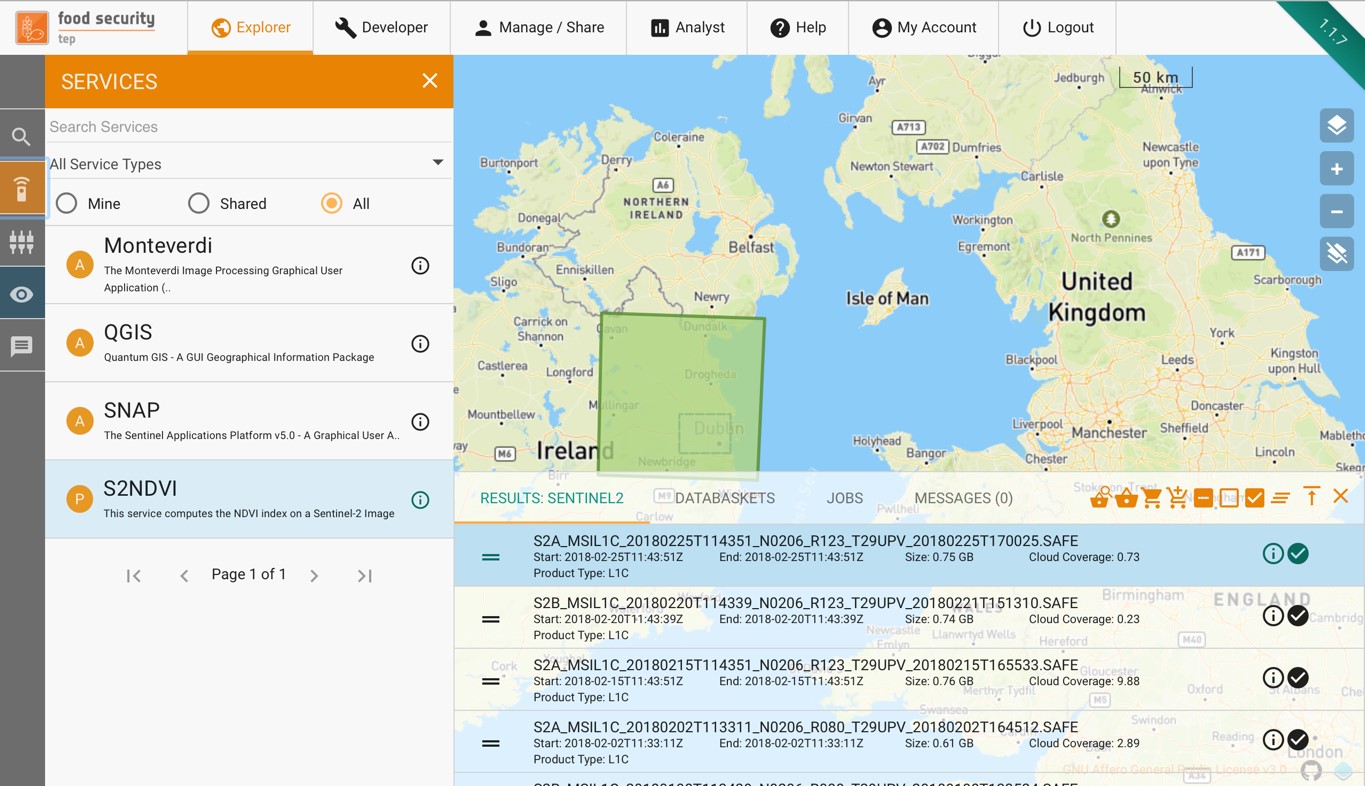
Services are processes that can be run on selected data, as described below There are also services which represent toolboxes that can be run on the data; these behave slightly differently and are described in Using Applications within FS TEP.
2.4.2. Running a Service
To run a service, click on the chosen service in the menu.

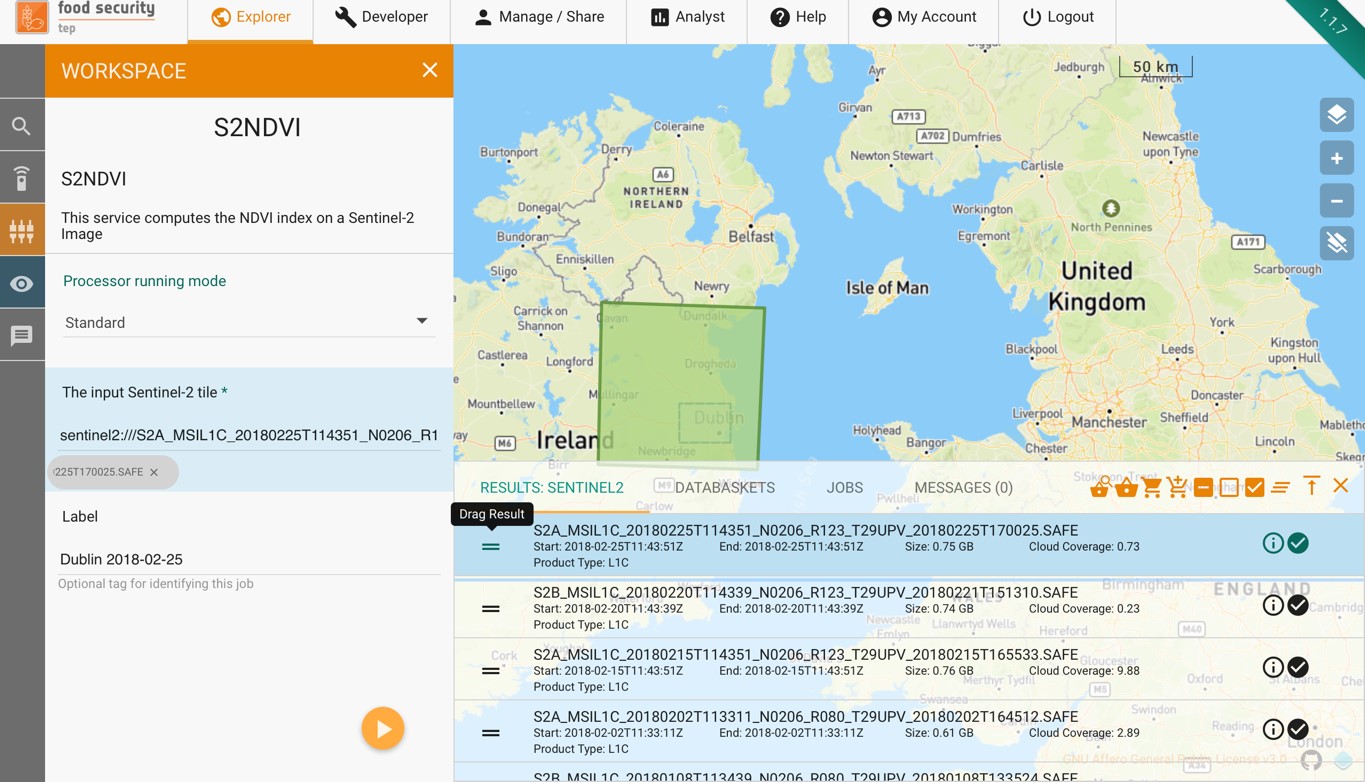
This brings up the workspace for the service, showing the input parameters required for the service.
The input parameters required will vary from service to service, but there are some common features:
Processors can be run in two modes: standard or systematic. Most users will just require standard processing I.e. processing of one or more products in a single processing run.
For advanced users, systematic processing is described in Systematic Processing.
Input data products (e.g. a sentinel-2 tile in the example above) can be dragged and dropped from the search results menu using the = symbol. Instead of single tiles, users can add multiple tiles or a databasket, in order to process multiple products in parallel. (See also Using Services)
Some processors are configured to work as parallel processors, generating subjobs as required (even if only one input).
Some services require additional reference data, which can be either uploaded by the user or else searched for as described in Searching for Reference Data.
Each job should be given a label to allow it to be identified.
Once all input fields have been completed the job is started by pressing on the arrow. The user will then see a message like this:
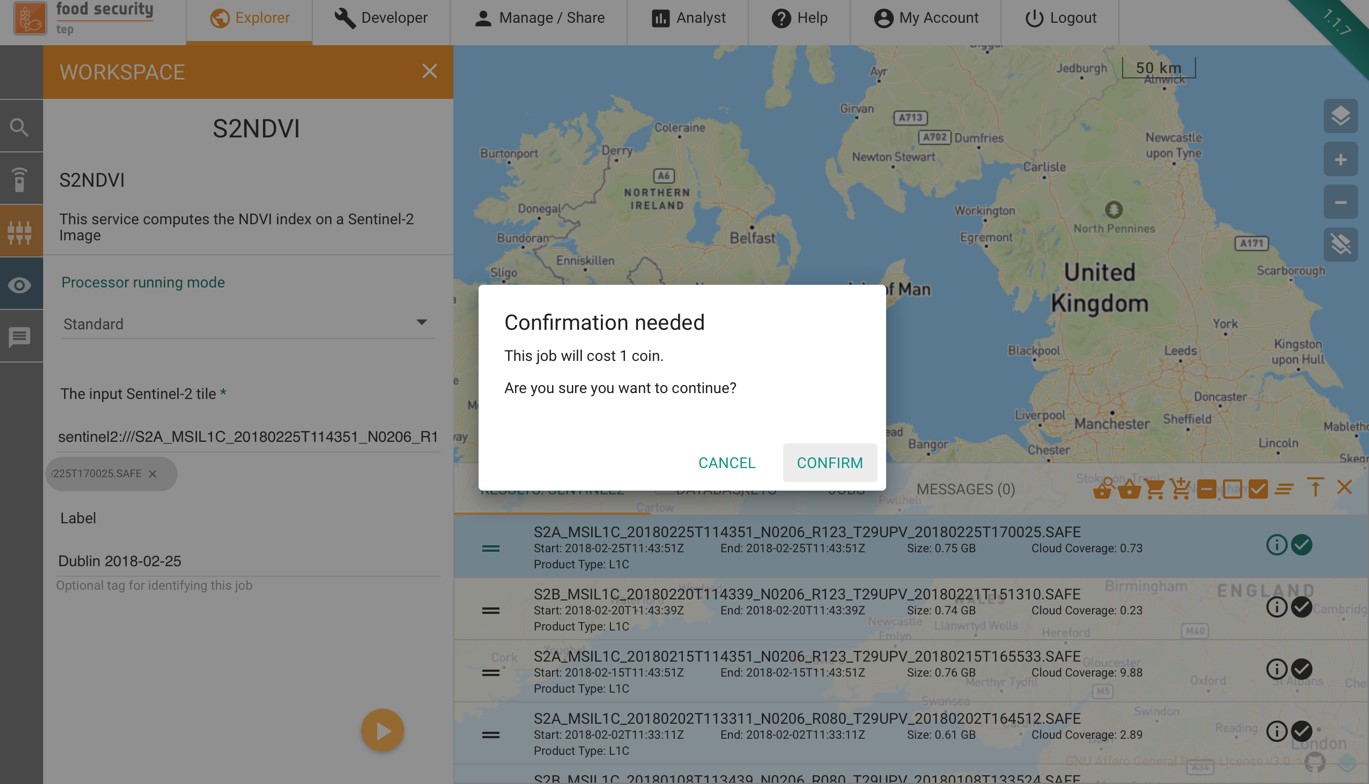
Pressing “Confirm” will cause the job to start and the users coin balance to be debited by the amount stated. The progress of the job can then be monitored as described in Using Jobs.
If a user does not have sufficient coin balance then the job will be rejected. See Use of TEP Coins for more details and how to request coins.
Note that where multiple (N) products have been input, the number of coins required will be N times the costs of a single product.
2.5. Using Jobs
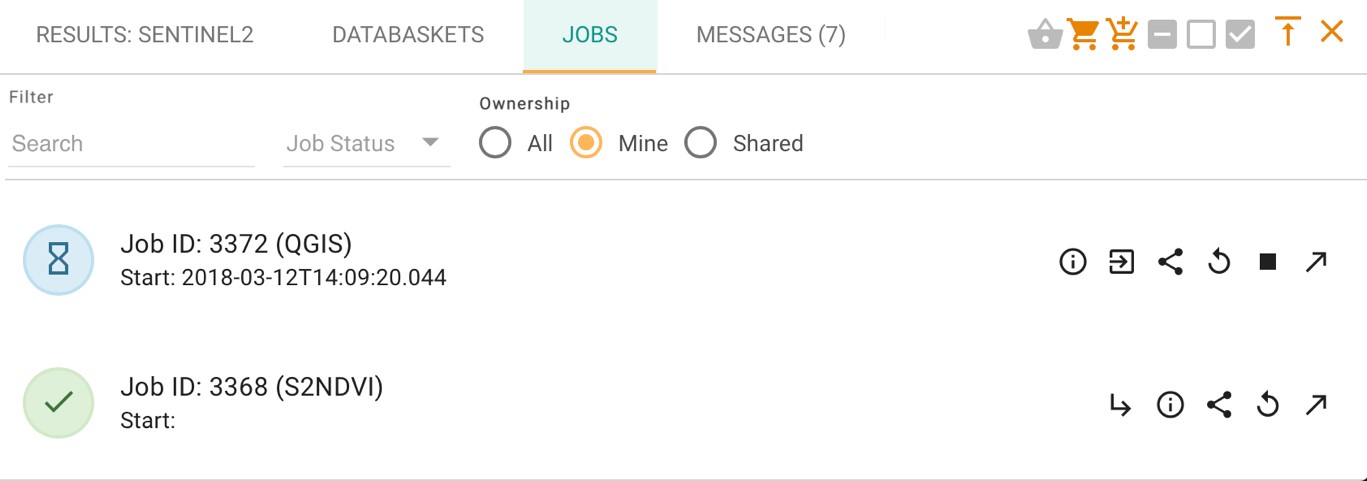
Once launched, jobs can be tracked from the “Jobs” section of the data panel, as in the example below.
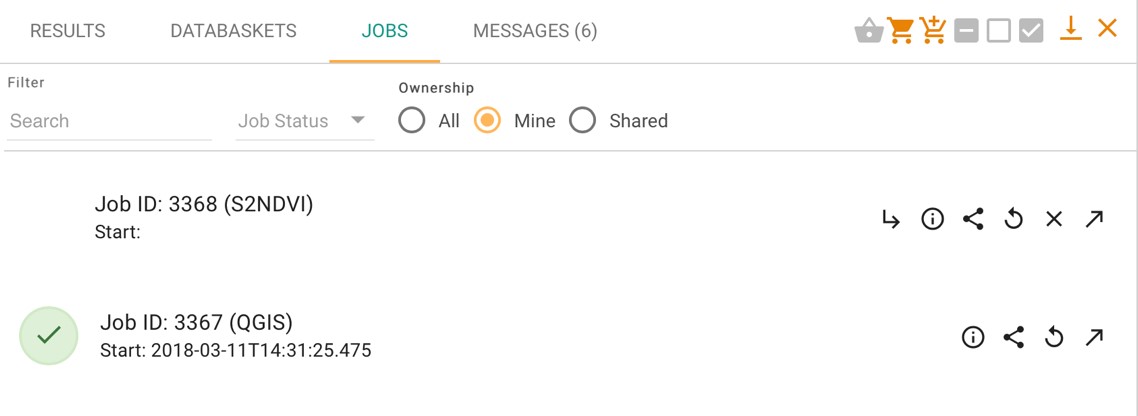
This lists the user’s current and past jobs, and allows the user to:
See basic information and job status about the job
Share the job
Edit and rerun the job (i.e. to revise the parameters then to restart a new job with these modified parameters)
Open the job in the manage/share interface
Cancel the job
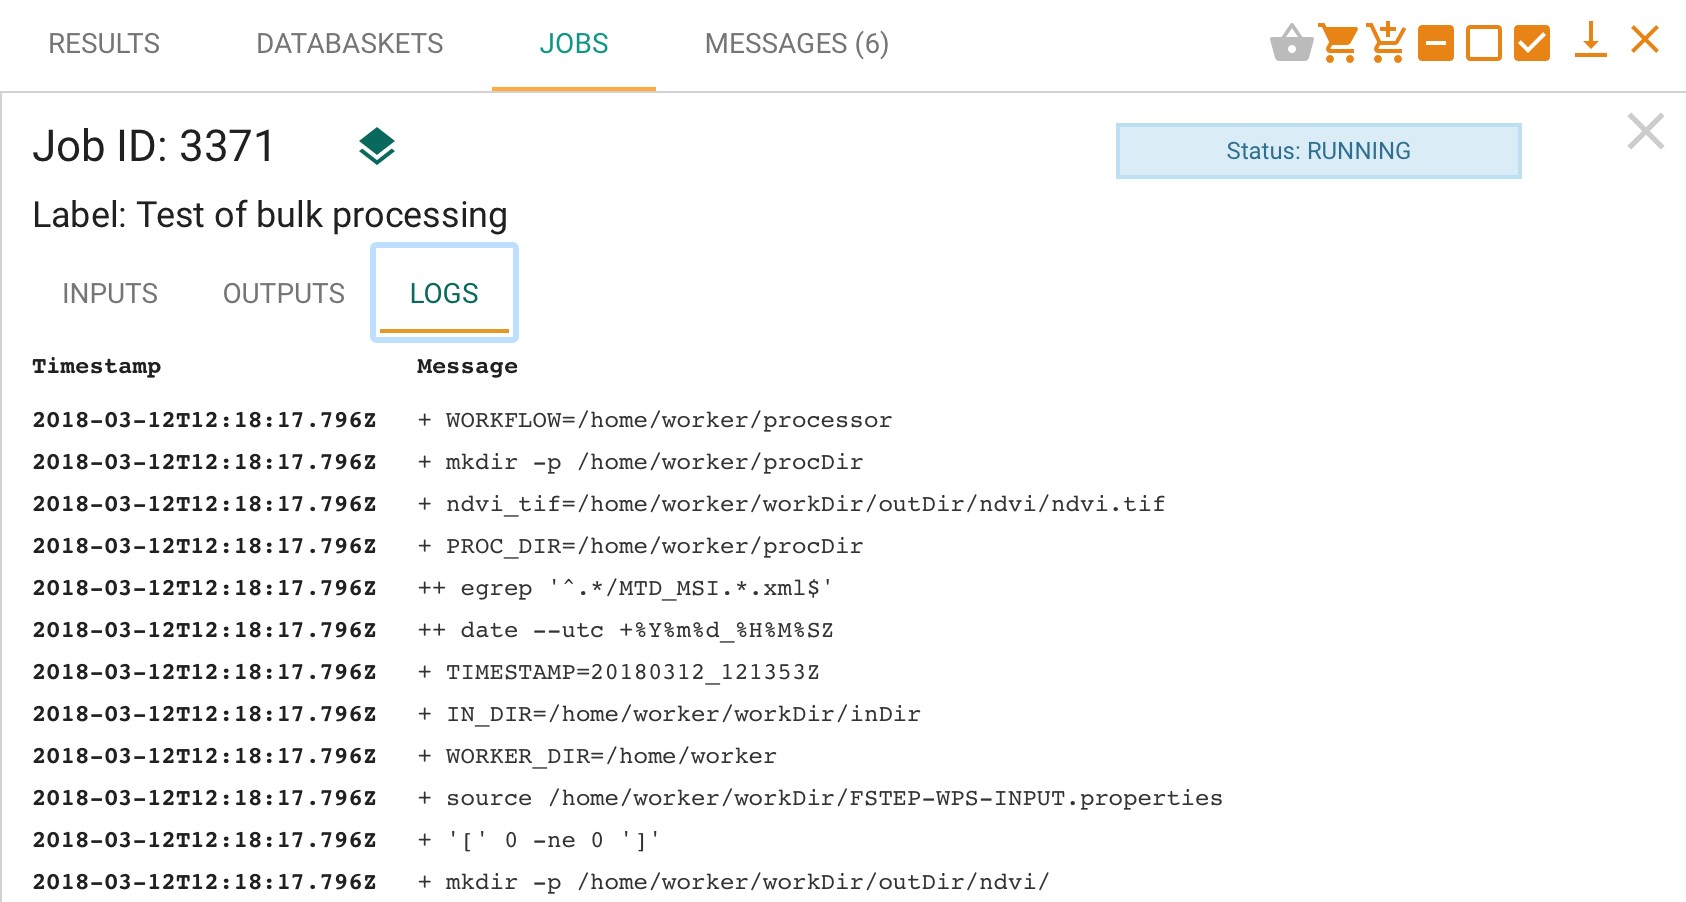
Double clicking on a job in the list will give further information, in particular the inputs, outputs (once ready) and log files for the job, as in the example below.
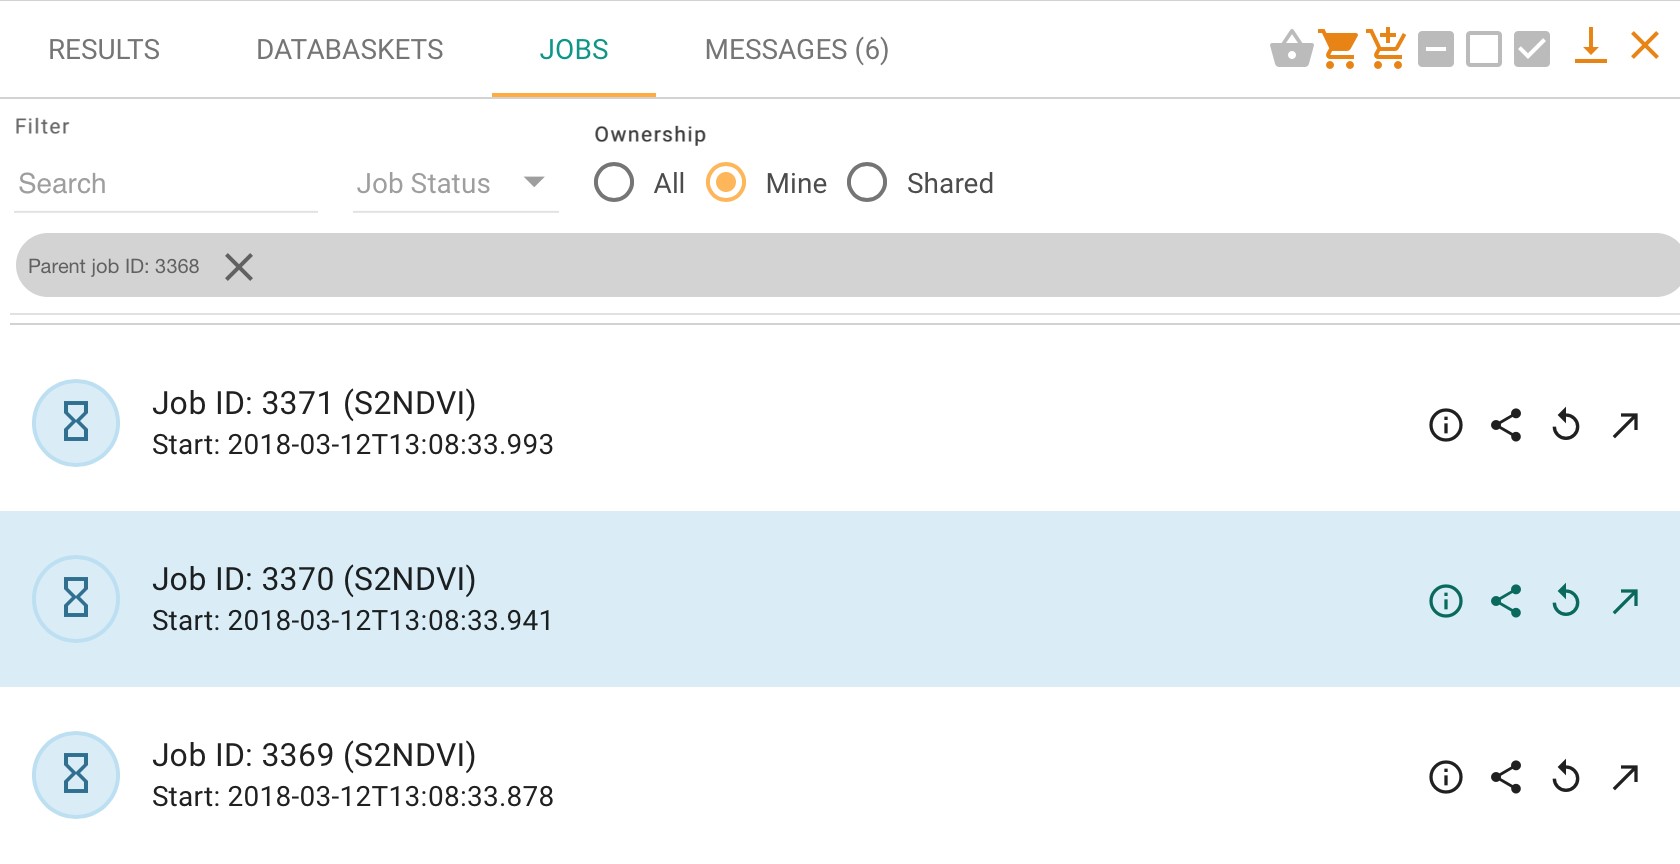
If a service has been run with multiple products (or the service is configured for parallel processing), then the system treats this as a single job with a series of sub-jobs, one for each individual product, as in the figure below.
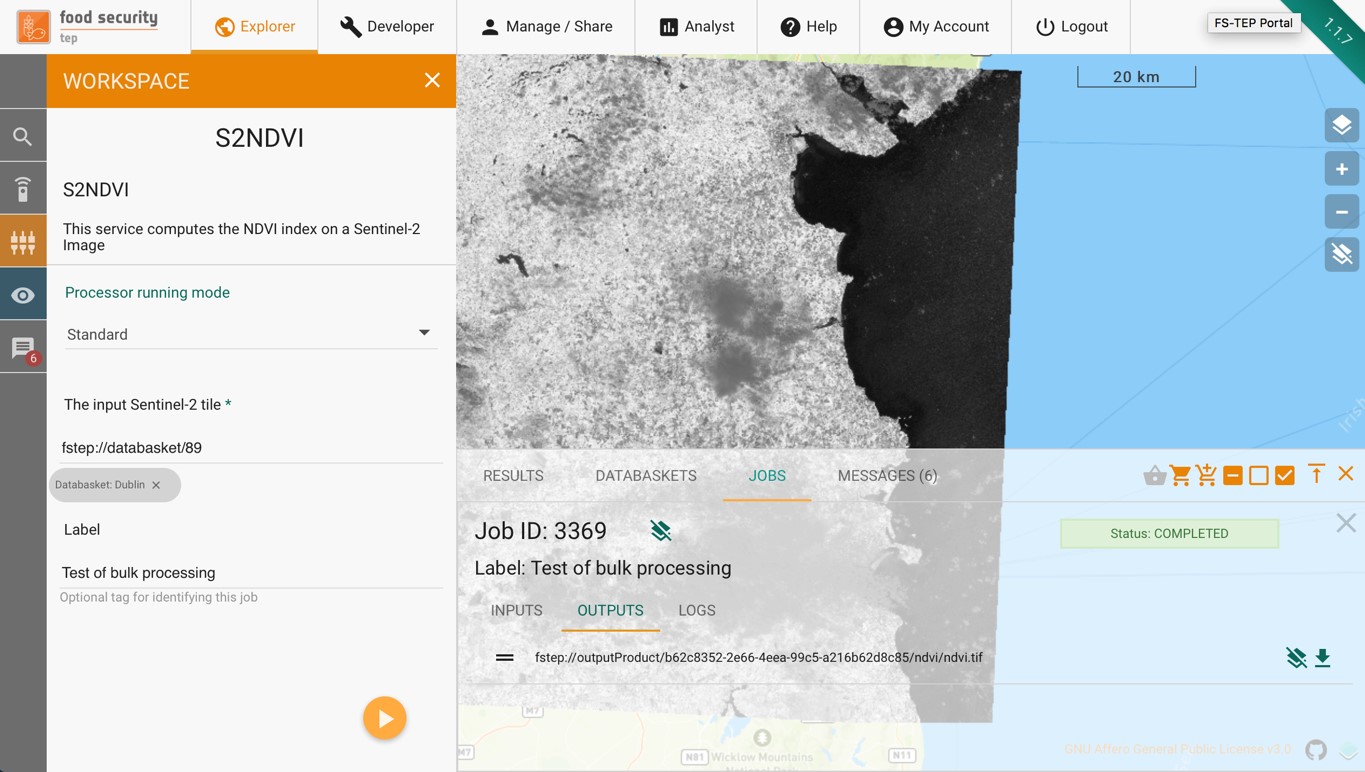
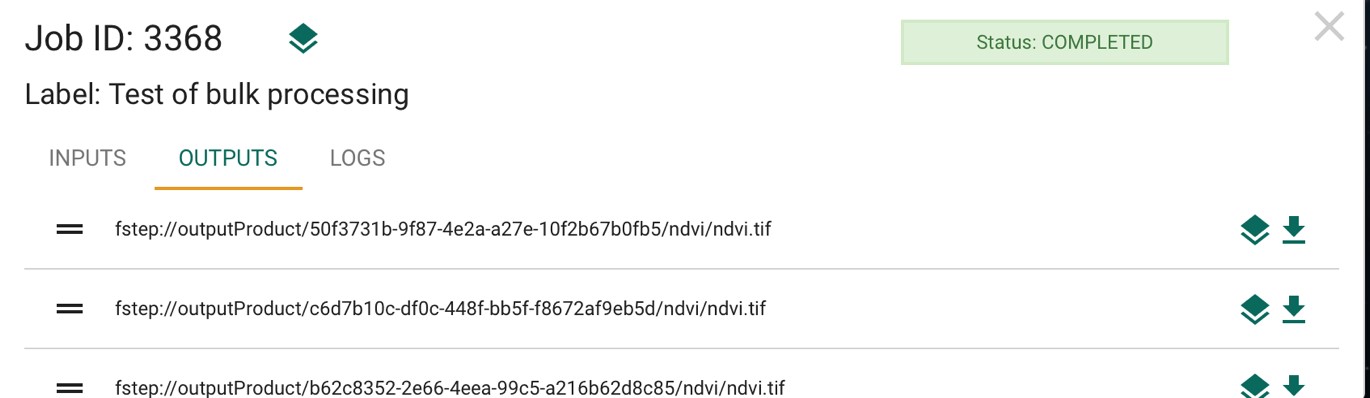
Once a job has finished, the files produced will be listed on the “outputs” tab.
Clicking on the
 symbol will cause the outputs be displayed on the geoserver map, where compatible. (Example shown below.) Results can also be opened using a toolbox
Clicking on the
 symbol will download the outputs to the user’s local machine.
Outputs can also be shared as described in Managing and Sharing.
Where multiple products have been input, the top-level job will list multiple outputs from the individual sub-jobs, as in the example below
2.6. Systematic Processing
In addition to the “standard” processing mode the platform also offers the option to perform processing in a systematic mode.
If this is selected, then the workspace of the service changes, so that as well as the input parameters of the selected service (see Using Services) the input parameters of satellite data search (Searching for data) are also listed, as shown in the figure below.
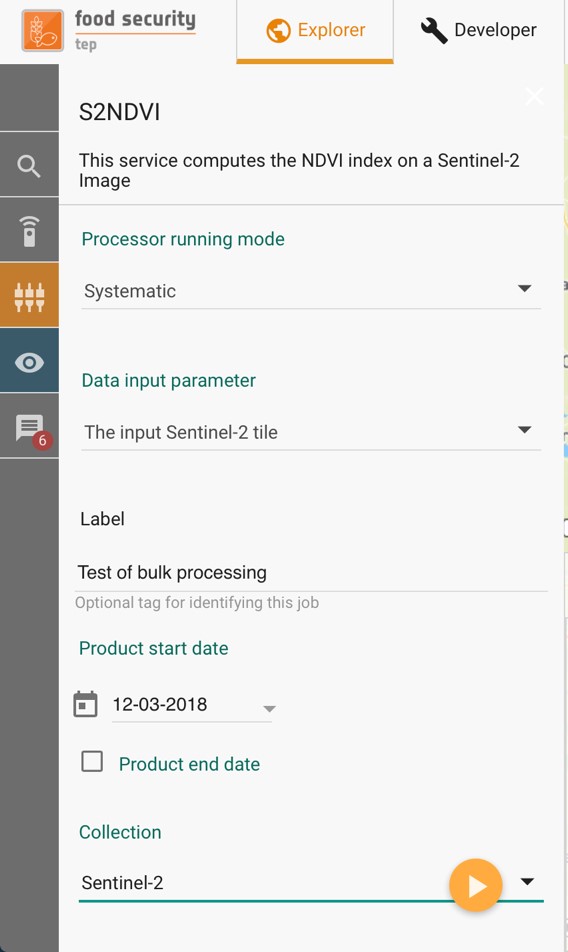
For this option, instead of inputting a satellite product (or products) directly the user specifes criteria for the input satellite data, including:
Satellite Collection.
Processing level or other specification of the satellite data to use.
Start and end dates. (The end date is optional.)
Area of interest.
Product identifier string.
Other parameters (e.g. cloud coverage) depending upon the satellite collection.
Once this service is running, the FS TEP system will periodically search for data that matches the criteria. If it finds any, then it will launch a job to process the new data using the specified service, making the output available in the same way as for any other job.
This means that once the job is started, there will first be a bulk processing of any historic data, then periodic processing of any new data that arrives. If an end date is specified then no data will be processed after this date, otherwise the processing will continue.
Note that any processing will be conditional upon the user having a sufficient coin balance. If the user’s balance expires then the processing will be paused, then resume once the balance has been augmented. At the moment the system does not foresee any warning when the user’s balance is about to expire.
2.7. Using Applications within FS TEP
Not all of the services provided process data directly to produce some output, the system also provides the users with various applications that can be used to manipulate data.
The current applications available are listed below, together with links to where there are appropriate tutorials:
EO Toolboxes
Monteverdi: https://www.orfeo-toolbox.org/documentation/
SNAP: http://step.esa.int/main/doc/tutorials/snap-tutorials/
GIS Toolboxes
Generic applications also relevant for EO/geospatial analyses
R Studio: https://www.rstudio.com/
Jupyter: https://jupyter.org/
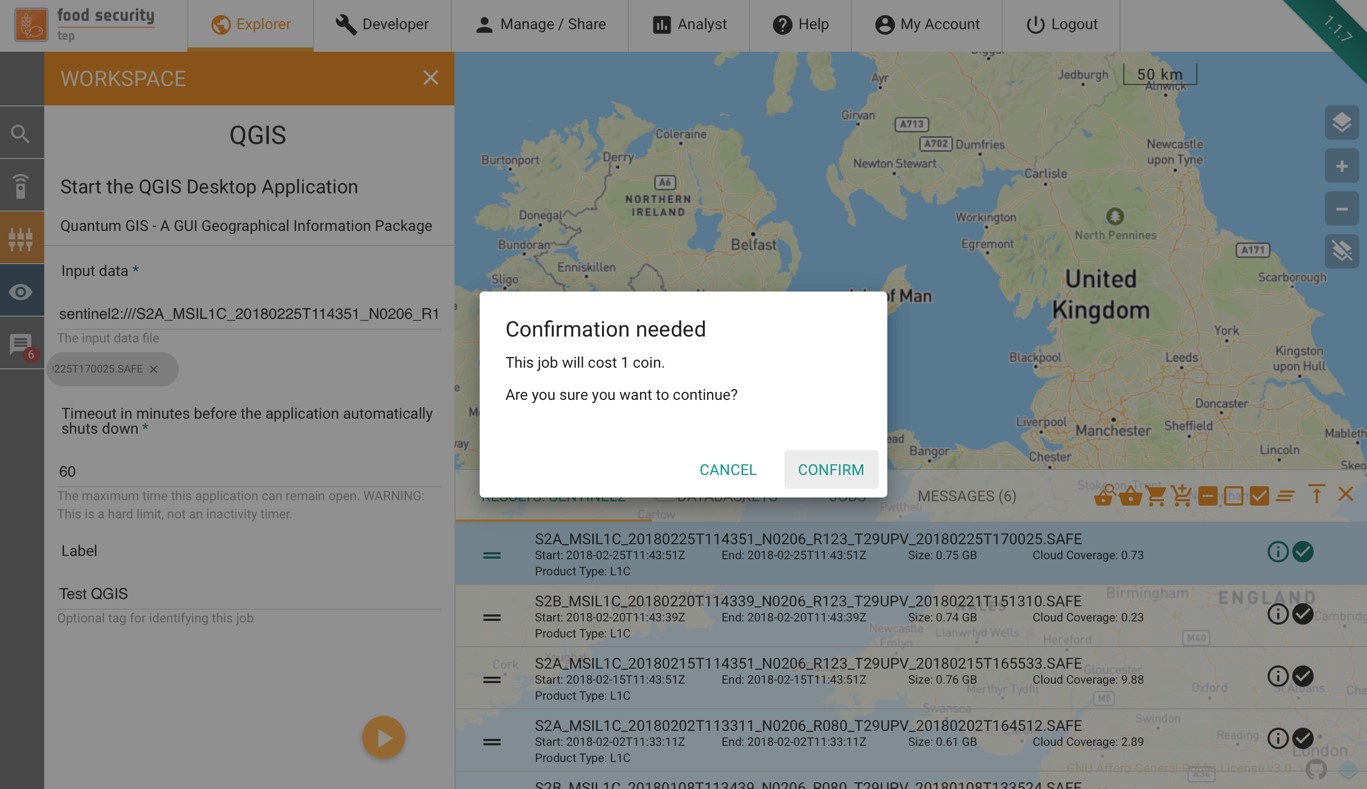
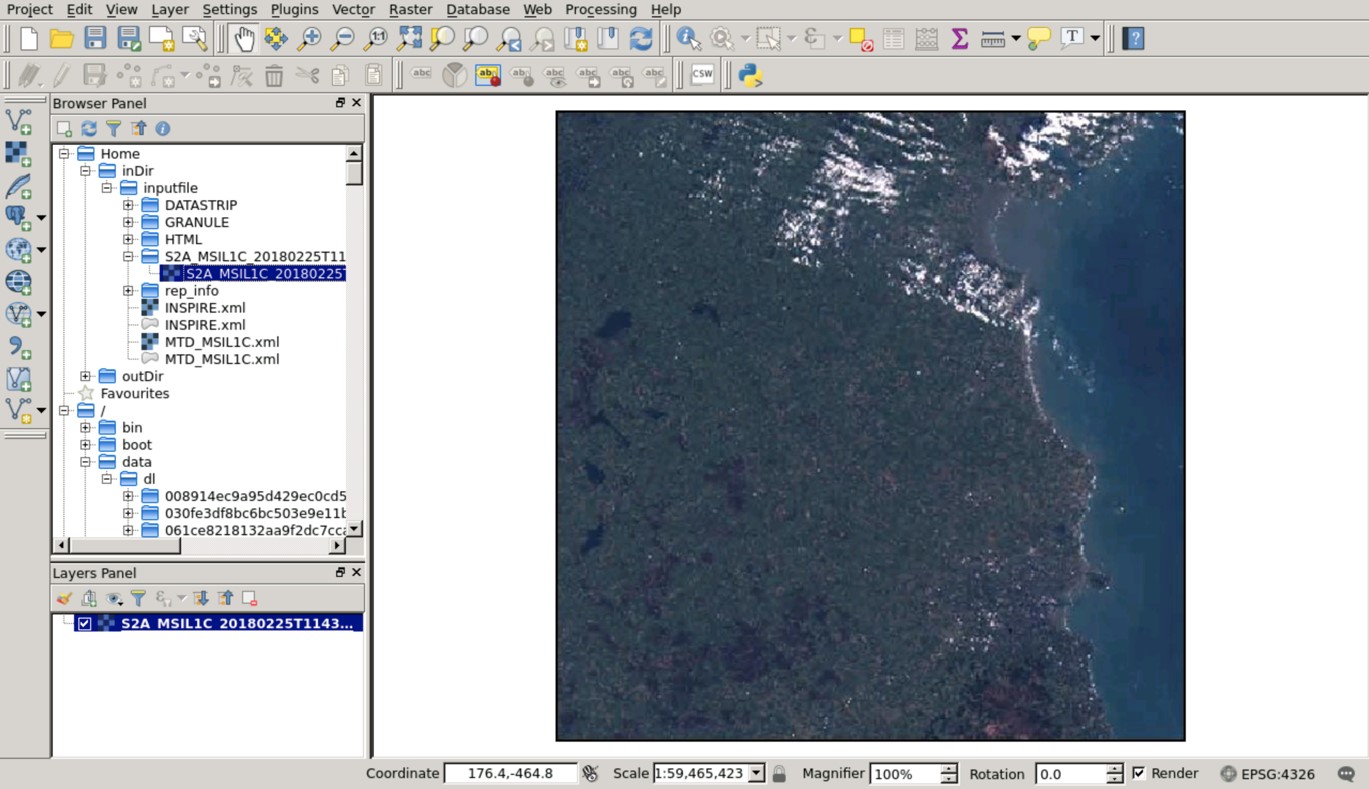
To start an application, select the application from the services menu, and then drag and drop input data as for any other service. You should also specify:
A timeout period (default 60 mins)
A label to identify the job
Pressing the arrow will give a message asking for confirmation to debit coins from your account:
The job will initially appear in the “jobs” part of the data panel as pending:
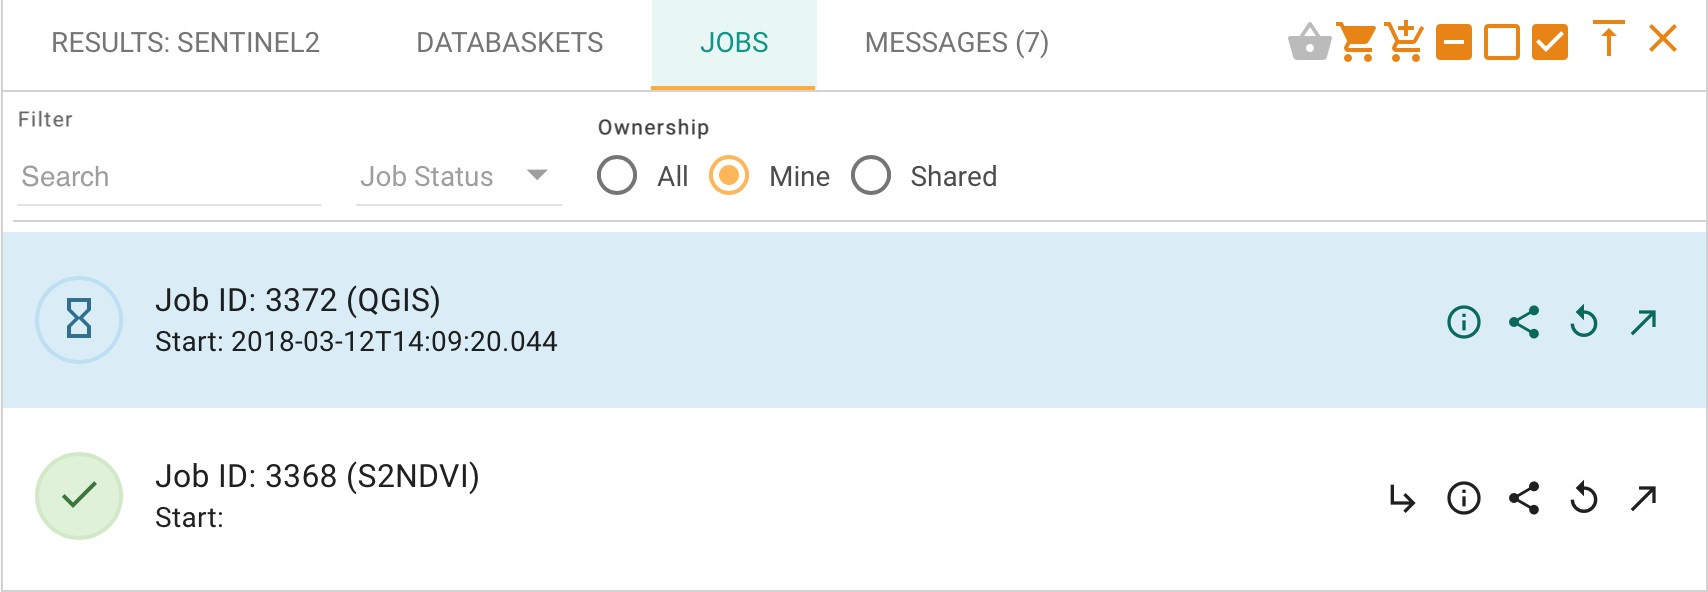
Once the application is ready to be launched, this menu changes as shown below:
Clicking on the  symbol will open the GUI window in a new tab:
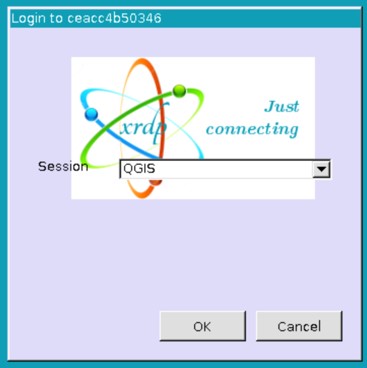
Click OK to start the application:
2.8. Persistent folders
FS TEP processors and applications run inside Docker containers with ephemeral storage. Processing outputs are collected when the processor/application finishes, according to the rules defined in The platform behaviour for output.
In some cases, however, it is advantageous to have a persistent folder available in which files can be saved to survive the scope of a single processing.
Some examples are:
Save some applications customised configuration file to be reused across multiple invocations
Save some data that will be used multiple times (e.g. a Jupyter notebook)
Share data between multiple applications (e.g. perform a first level EO data transformation in SNAP and then further process the results in QGIS)
For these use cases, the platform makes available on request the provisioning of a persistent folder for the user.
The persistent folder will be available inside the Docker container at the path /home/worker/workDir/persistentDir/files.
See Frequently Asked Questions for information on the procedure to request a persistent folder.
3. Service Development
3.1. The Developer Tab
The developer tab – only available to expert users – allows to:
Create and edit services, including new processors and applications.
Create and edit service templates.
The figure below shows how the developer tab initially appears.
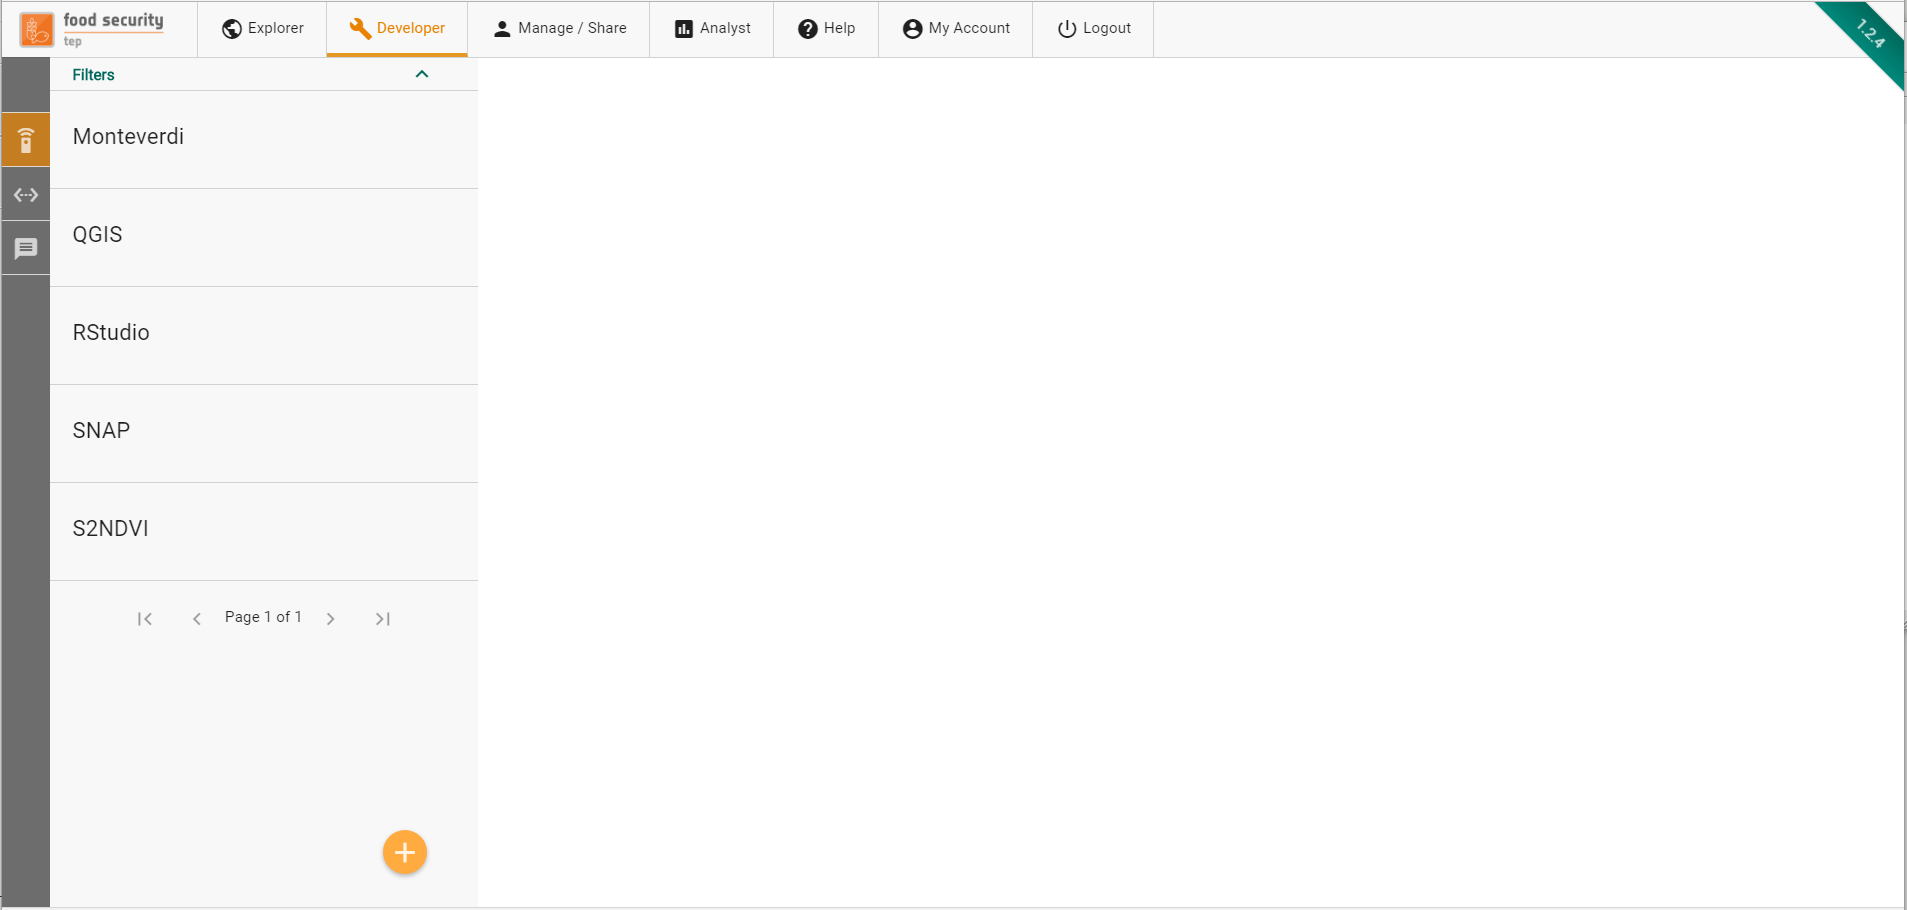
The tab presents a list of available services and a side toolbar to create new services and service templates.
3.2. Creating a new service
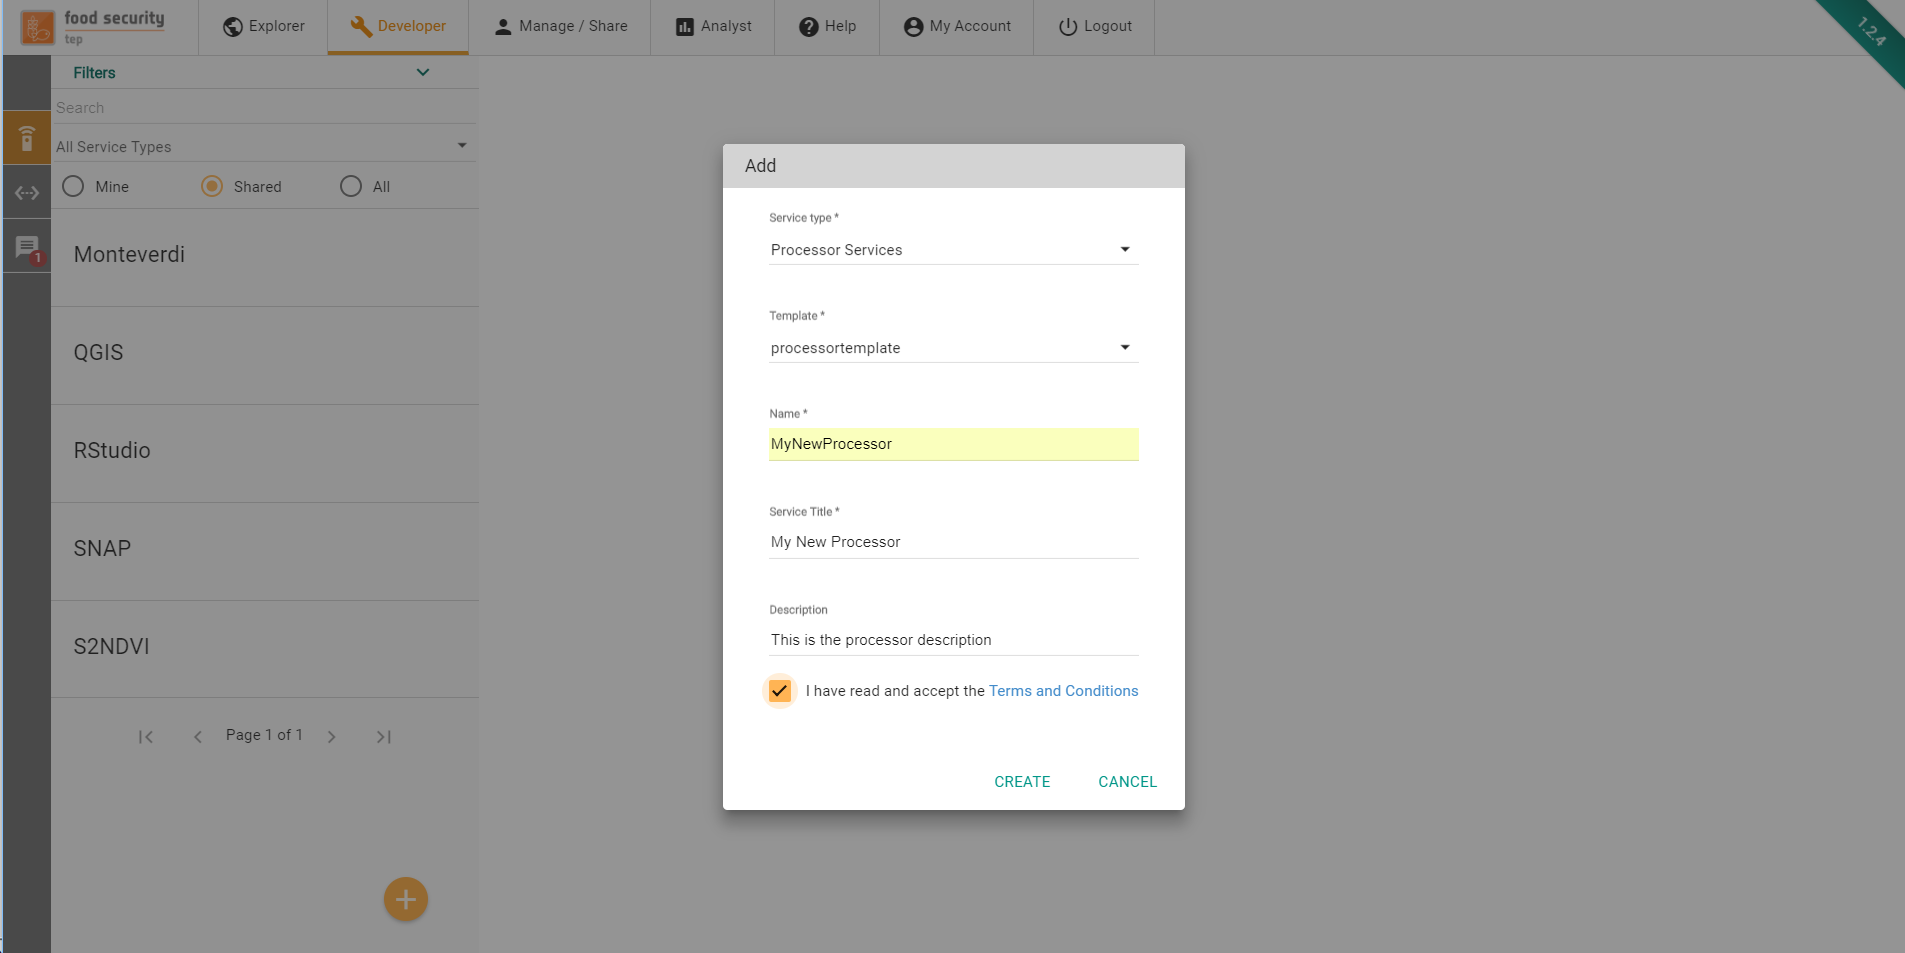
FSTEP Services are packaged and deployed within Docker containers (www.docker.com). Using the Add button at the bottom of the left sidebar, users can start defining their own services.
In order to create the service, the following information must be provided:
Service Type. The type of service to be created (see Service Metadata for details)
Template. The template to be used to bootstrap the service with an initial specification and set of files
Name. The service name. It has to start with a letter, and only contain letters and numbers. No spaces or special characters allowed.
Title. This can be used to give a user friendly name to the service
Description. Here the developer can provide a longer, natural language description of the service.
Terms and Conditions. By ticking this mandatory box, the developer accepts the terms and conditions that govern the integration of the service on the platform (link to the full T&C is provided).
On the next screen, the user can start defining the service specification.
3.3. Creating a new service template
FSTEP Services Templates are partial specification of services that can be used as blueprints to create new services. Using the Add Template button at the bottom of the left sidebar, users can start defining their own service templates.
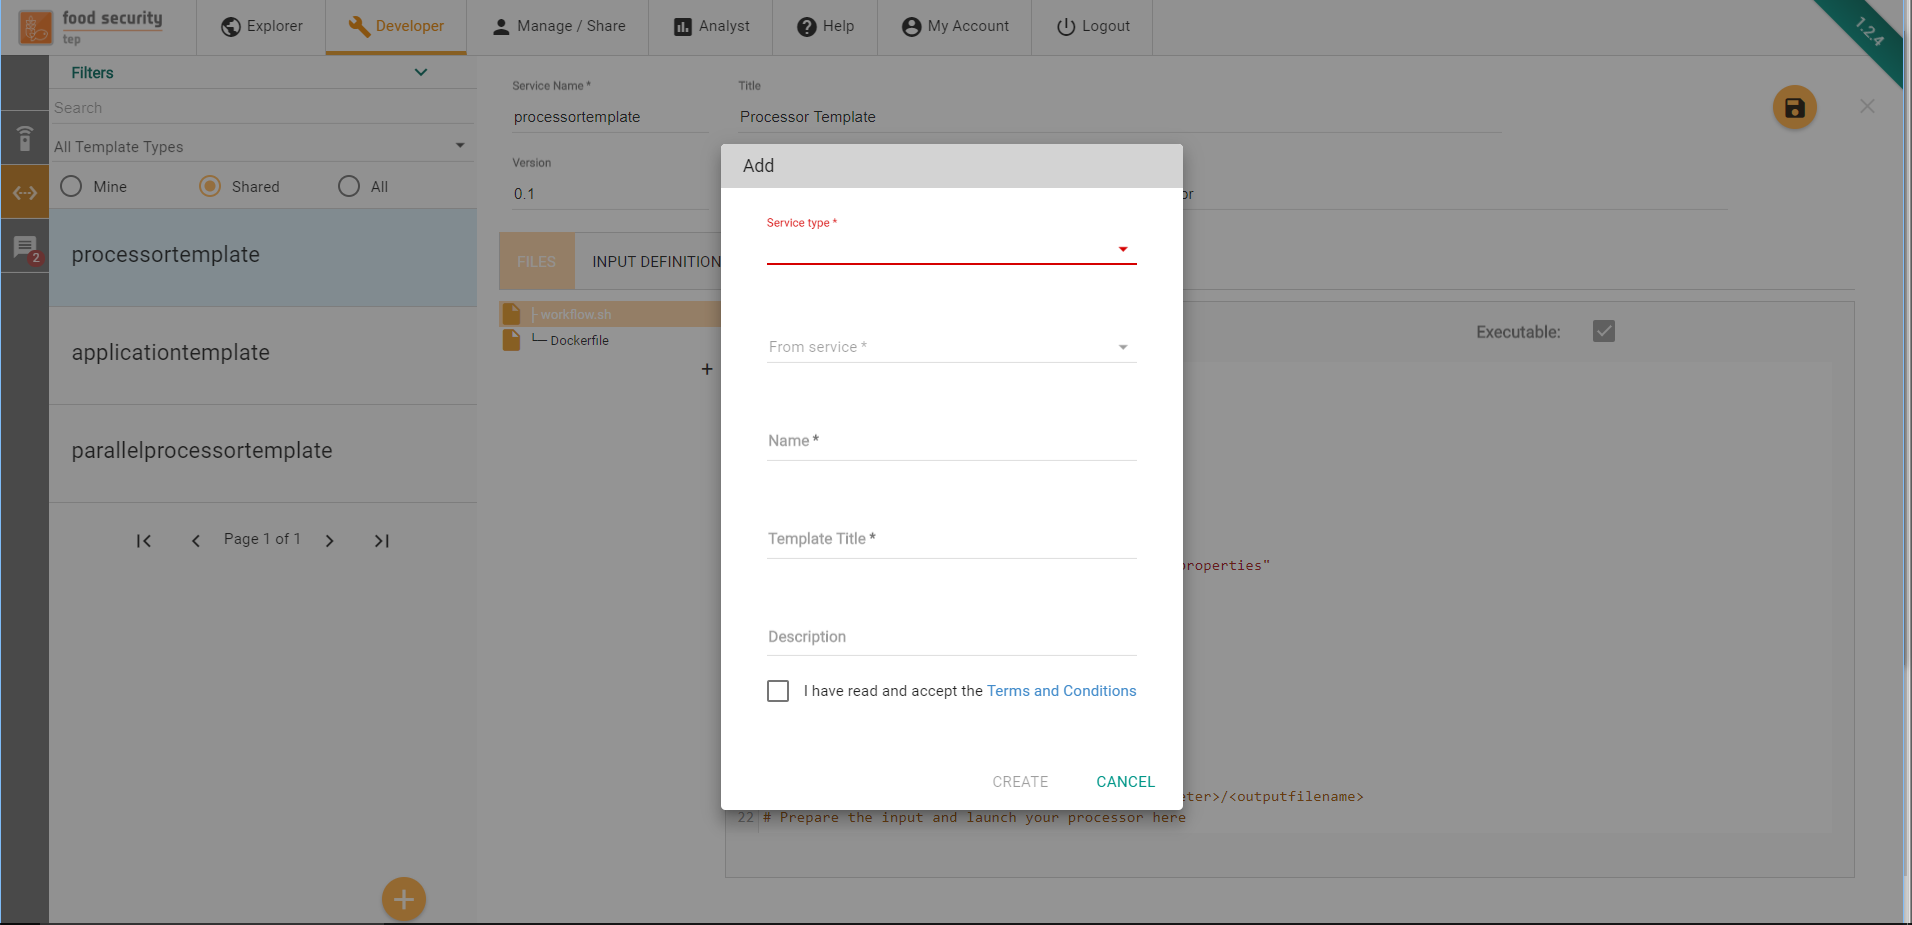
In order to create the service template, the following information must be provided:
Service Type. The type of service template to be created (see Service Metadata for details)
From service. The template can be initialized with the content of an existing service or from scratch (in which case None must be selected here) to be used to bootstrap the service with an initial specification and set of files
Name. The service template name. It has to start with a letter, and only contain letters and numbers. No spaces or special characters allowed.
Title. This can be used to give a user friendly name to the service template
Description. Here the developer can provide a longer, natural language description of the service template.
Terms and Conditions. By ticking this mandatory box, the developer accepts the terms and conditions that govern the integration of the service template on the platform (link to the full T&C is provided).
On the next screen, the user can start defining the service template specification.
3.4. Service Specification
On the next screen, the user can start defining the service specification.
A service specification is composed of several elements.
The Service Metadata describe properties of the service (including its name, title, description, version and service type).
The Files tab allows the creation of the files that compose the service
The Input Definitions tab is used for the specification of the service inputs
The Output definitions tab is used for the specification of the service outputs
The User Mounts tab allows to specify mounts (i.e. folders of data) that should be made available to the service Docker container at runtime
The Container build is used to manage the underlying Docker container image
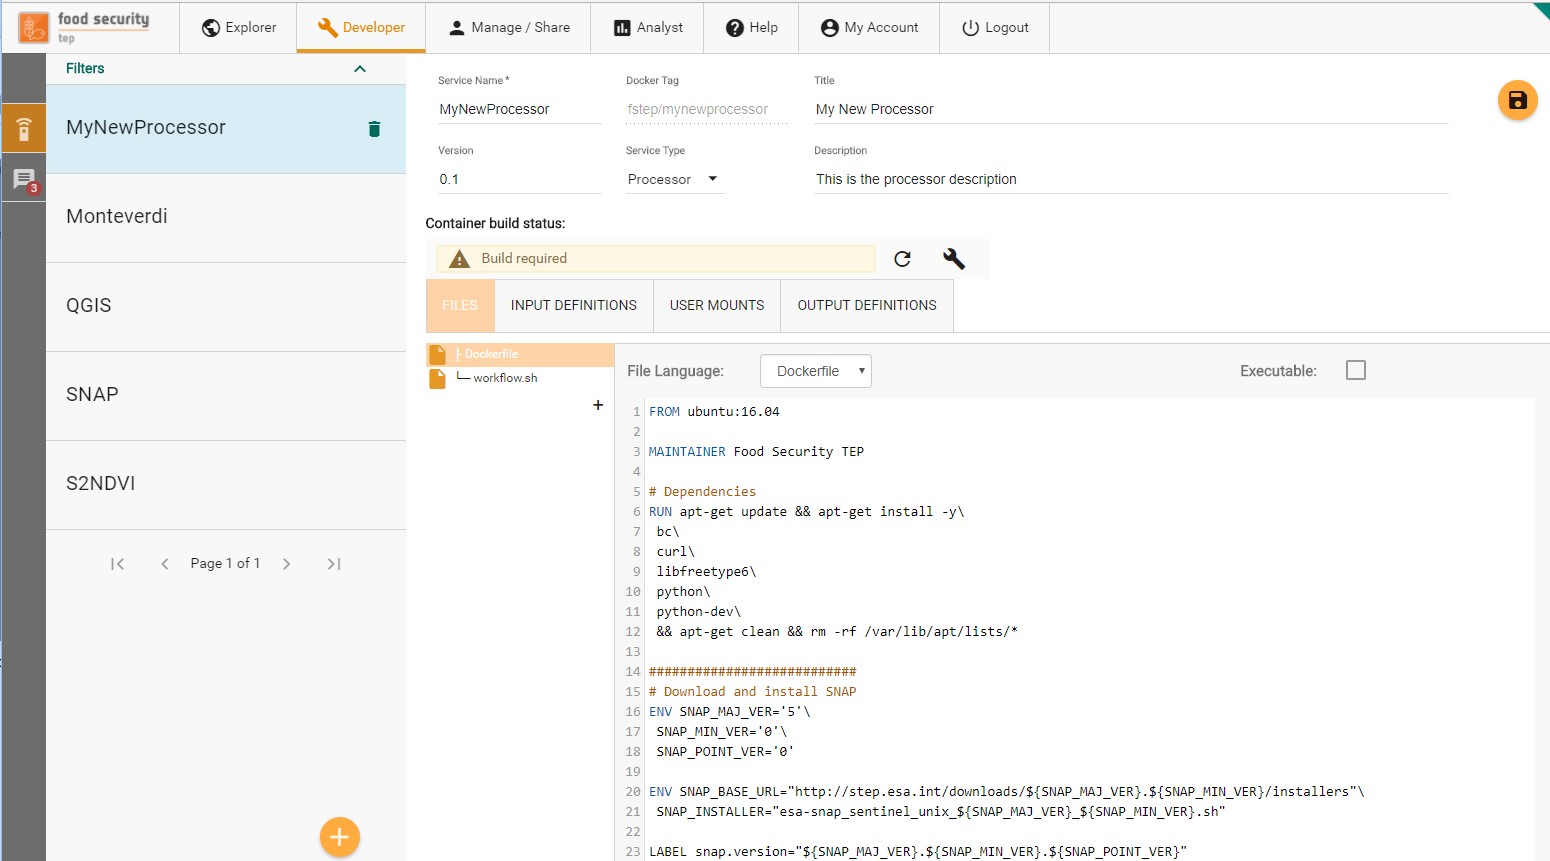
3.4.1. Service Metadata
In the top fields, the service metadata (name, title, description) plus the additional version field can be edited. The Docker Tag that is associated to the service is immutably generated on service creation. The Service Type field can be used to change the service type. The possible values are
Application: An application is a service that requires user interaction. This kind of service is typically used to provide a service with a GUI or Web UI. The service execution is not bound to terminate when the end of its entry point (see more below) is reached.
Processor: A processor is an algorithm that is executed without user intervention. Processors start with a user specified entry point script and terminate when this script terminates. The execution of a processor will trigger the creation of a processing job.
Bulk Processor: A bulk processor is a specialization of a processor that will automatically make the processor outputs visible by all users in the search interface.
Parallel Processor: A parallel processor is able to trigger more instances of the processor based on an input with a multiplicity higher than 1 (e.g. a databasket or a list of input files). The execution of a parallel processor triggers the creation of a parent job and as many child job as the number of inputs provided for the execution. The parallel processor must identify a specific input parameter that will receive the different instances of the multiple input. The other input parameters will be passed unchanged to all the processing job generated. More on this in section.
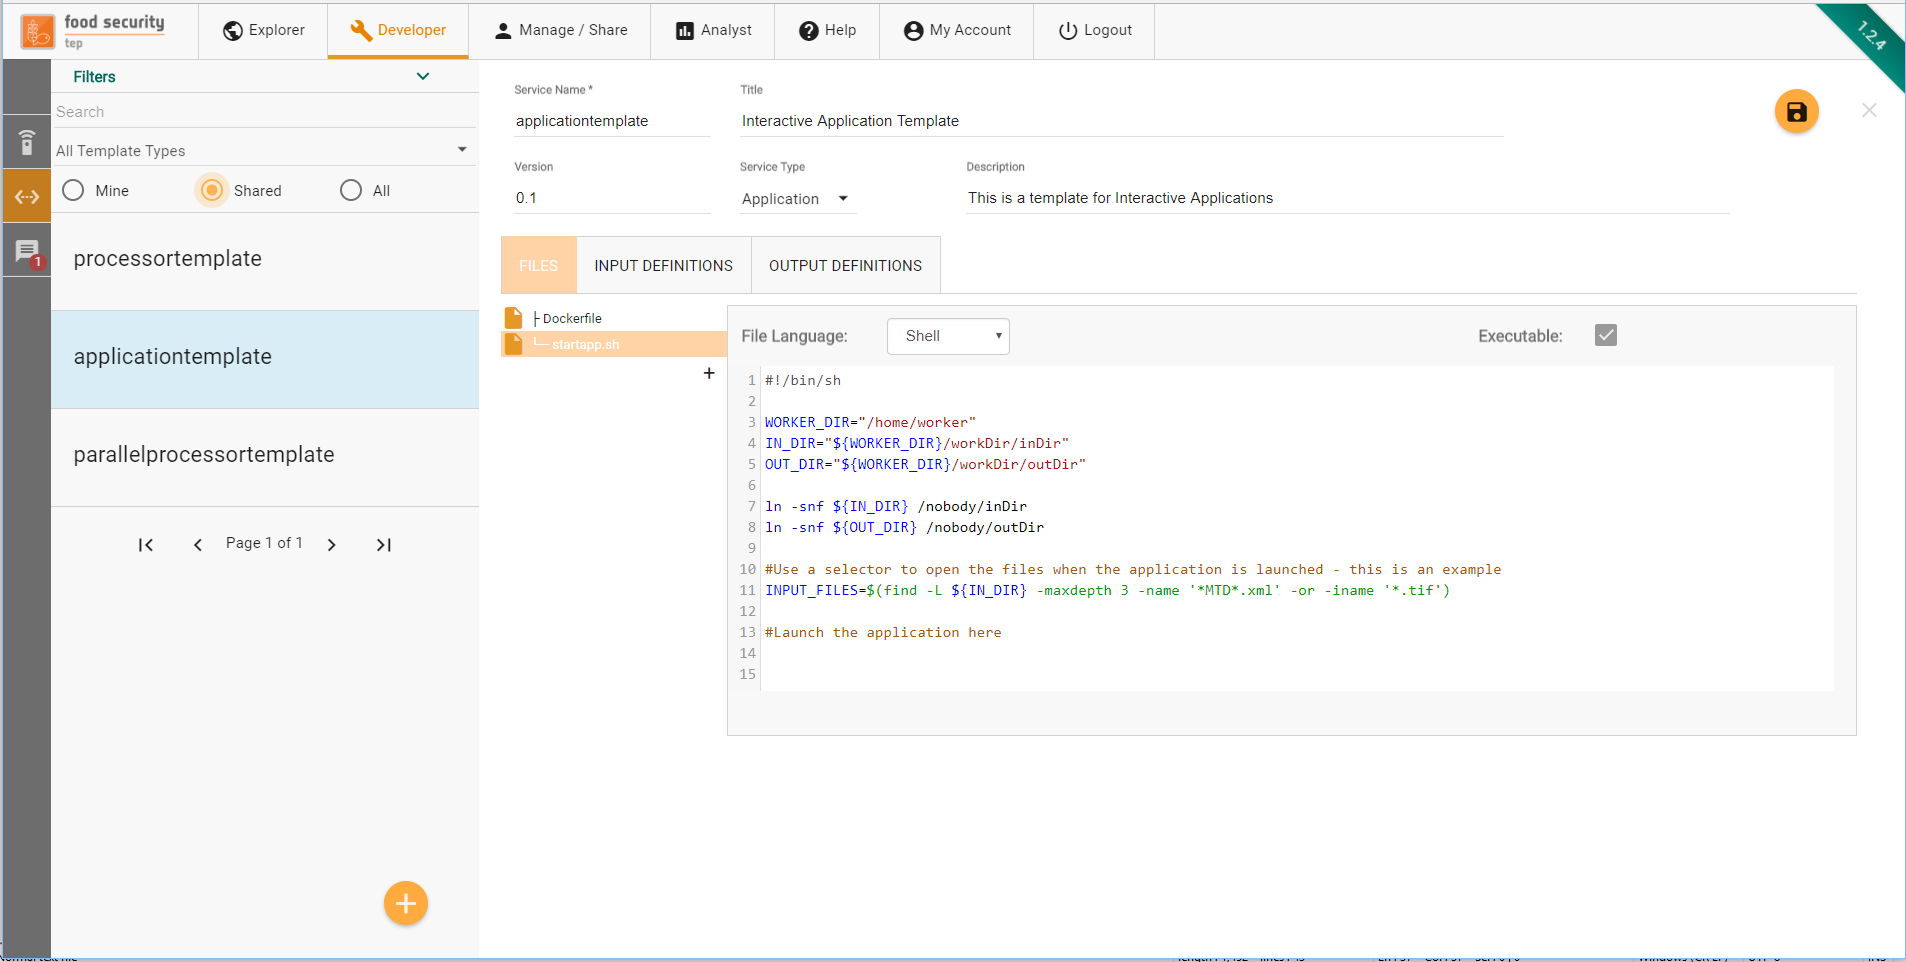
3.4.2. The Files Tab
Through the Files tab, users can create the different files that compose the processing service. A minimum of two mandatory files must be specified:
A Dockerfile is a text document that contains all the commands a user could call on the command line to assemble an image.
An entrypoint, referenced in the Dockerfile through the ENTRYPOINT instruction, defines where the execution of the container starts at runtime. A default Bash entrypoint called workflow.sh (or “startapp.sh” in the case of an application) is provided by the platform as a template when the processor is created. The developer is free to change the entrypoint with any other script.
The Files Tab also provides the Code Editor, where the user can create the content of the file supported by a syntax highlighting feature for his language of choice.
If the file to be created is supposed to be executable, the “Executable” checkbox should be ticked.
The interface supports the specification of text files. Any binary file should instead be managed through the Dockerfile, e.g. by installing or downloading binary files available at external sites.
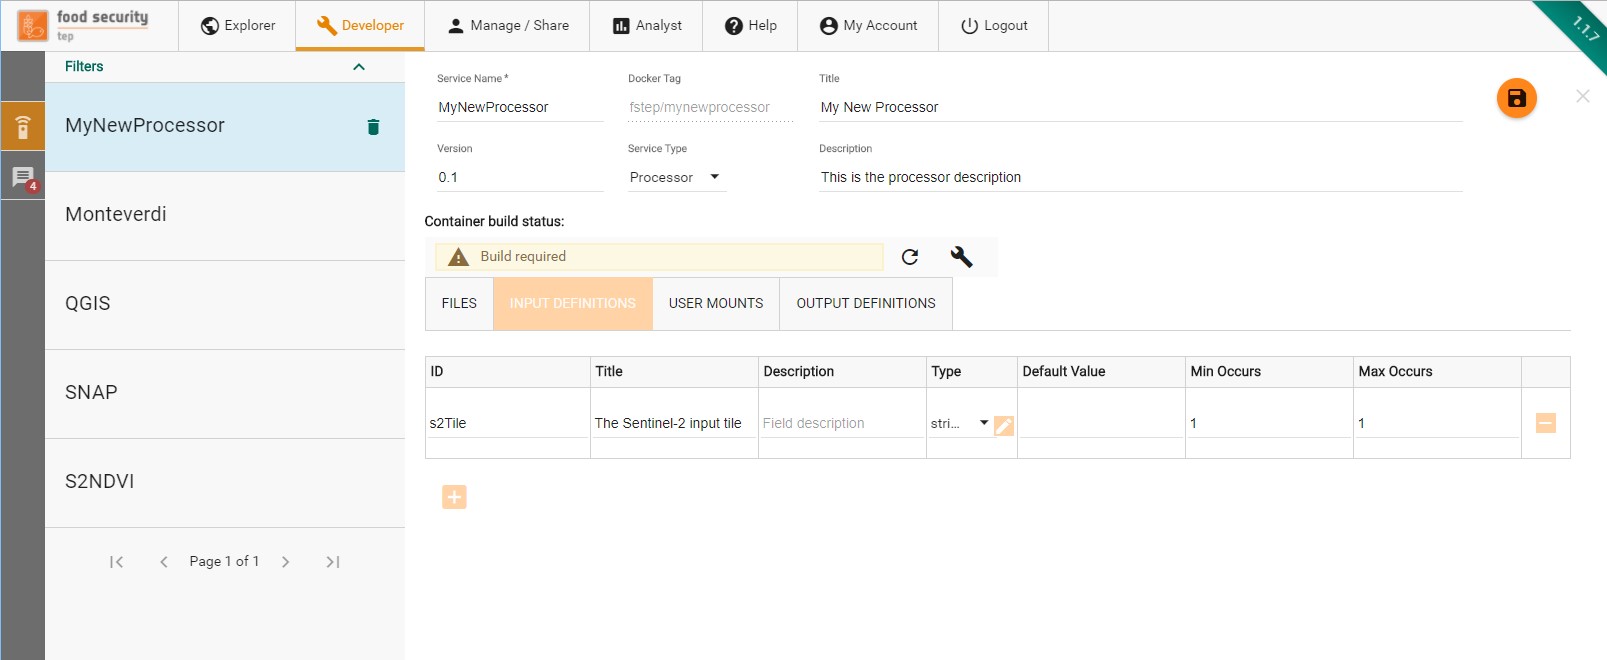
3.4.3. The Input Definitions Tab
Through the input definition tab, the developer specifies of the service will interact with the platform to get its input.
For each input managed by the service, the developer has to enter a definition that includes:
The input id, a string used to identify the input inside the service (see below).
The input title, a human readable name for this input.
The input description, a longer natural text description of this input , used on the workspace panel.
- The input type, which can be:
A literal value, i.e. a string, integer or double
A complex value, defined by a complex MIME type and an extension.
The input default value, used when no value is provided by users when the service is launched
The input minimum occurrences. A minimum occurrence of 0 indicates this input parameter is optional. A minimum occurrence of 1 or more indicates this input parameter is mandatory.
3.4.4. The platform behaviour for input
The FS TEP platform will behave as follows with respect to service inputs:
Any integer, double or simple string that is expected by a service will be delivered to its container in the form of a file (/home/worker/workDir/FSTEP-WPS-INPUT.properties) containing a line for each input in the form ID=VALUE.
Example
The developer defines an input with ID “rounding” of type double. A user invokes this service passing as arguments (through the GUI or through the API) the value 0.5. The platform will create inside the container the file /home/worker/workDir/FSTEP-WPS-INPUT.properties with the following content:
rounding=0.5
By reading this file, the service can then use the provided value as part of its computation. In a Bash script, this file will typically be read with the source command so that after the execution of that command all the input IDs and values will be available as environment variables.
For any string that is an URI of a platform managed resource, the platform will place the resource content in a subfolder of /home/worker/workDir/inDir having the input ID as name.
Example
The developer defines an input with ID “s2tile” of type string. A user invokes this service passing as arguments (through the GUI or through the API) the value
sentinel2:///S2A_MSIL1C_20180312T124041_N0206_R052_T26SNE_20180312T125451.SAFE
The platform will put the Sentinel-2 product corresponding to the above URI in the
/home/worker/workDir/inDir/s2tile
folder in the container.
To designate an input parameter as the one that will receive the different input files in a parallel processing, its ID must be named parallelInputs. Inside the processor, this special field must be referenced through the ID input.
Example
The developer defines an input with ID “parallelInputs” of type string. A user invokes this service passing as arguments (through the GUI or through the API) a data basket.
The platform will create n jobs, each one with an item from a databasket that will be available in the
/home/worker/workDir/inDir/input
folder in the container.
3.4.5. The Output Definitions Tab
The output definition tab defines how the service will interact with the platform.
For each output managed by the service, the developer has to enter a definition that includes:
The output id, a string used to identify the output inside the service (see below).
The output title, a human readable name for this output.
The output description, a longer natural text description of this output
- The output type, which can be:
A literal value, i.e. a string, integer or double
A complex value, defined by a complex MIME type and an extension.
The output default value, used when no value is provided by service for that output.
The output time regular expression, used by the platform to extract output timestamp metadata from the output file name, including start and/or end timestamps of the output product.
The output minimum occurrences. A minimum occurrence of 0 indicates this output parameter is optional. A minimum occurrence of 1 indicates this output parameter is mandatory
Time Regular Expression
The time regular expression describes how the timestamps should be extracted from the file name. It does so by leveraging named groups in the regexp. The supported named groups are:
?<start> for a group that represents the product start date
?<end> for a group that representes the product end date
?<startEnd> for a group that represents both the product start and end date.
The supported date and time format is “yyyyMMdd[[ ][‘T’]HHmm[ss][.SSS][XXX]]” which can be interpreted as:
A mandatory year/month/day date with four digits for year, two for month and two for day followed by an optional time composed of
An optional space followed by
An Optional T symbol followed by
Mandatory Hour and minutes fields followed by
Optional seconds specification followed by
Optional milliseconds specification followed by
Optional Timezone.
If not time is specified, Midnight UTC is assumed.
If no time zone is specified, UTC is assumed.
Example 1
An NDVI service produces files that observe the convention S2_NDVI_yyyyMMdd.tif, where there is a single timestamp representing the product start and end time.
The developer should add a timeRegexp expression of the form:
“S2_NDVI_(?<startEnd>d{8}).tif”
so that the platform will be able to extract from the file name and parse the corresponding timestamp (in this case, a date without a time) to represent the product start and end time.
Example 2
A change detection service produces files that observer the convention S2_CHD_yyyyyMMddThhmm_yyyyyMMddThhmm.tif, where the first block represents the time of the first image and the second block represents the time of the second more recent image
The developer should add a timeRegexp expression of the form:
“S2_NDVI_(?<start>d{8}Td{4})_(?<end>d{8}Td{4}).tif”
so that the platform will be able to extract from the file name and parse the two corresponding timestamps (in this case, dates with a time) to represent the product start and end time.
3.4.6. The platform behaviour for output
The FS TEP platform will behave as follows with respect to service outputs:
If a folder with the same name as an output id is defined inside the /home/worker/workDir/outDir folder, the content of that folder is saved as the service output for that id.
If a file inside the folder is of a type supported by the geometry extractor, geometry information are saved as part of the output metadata. Currently, the supported file type is GeoTiff.
If a time regular expression is defined for that output, the start and/or end timestamps are extracted from the file name and saved as part of the output metadata.
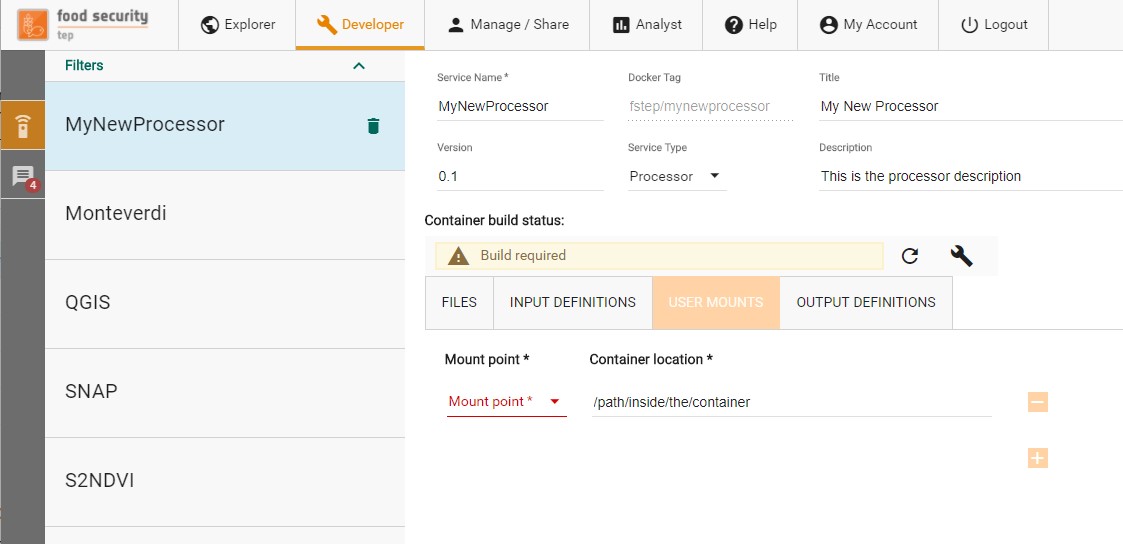
3.4.7. The User Mounts Tab
The platform allows to mount folders containing existing data inside the service containers. This mechanism can be used to provide folders with auxiliary data to the processor. At the current stage, to request the availability of a folder with some data, the developer has to contact the platform support to set up the data that must be provided inside that folder. Once the mount has been defined, the developer can define autonomously in which container folder this content has to be mounted.
3.4.8. The Container Build
The container build widget informs the developer about the status of the service Docker image. The following statuses are defined:
Build required: The service Docker image has never been built or the service files have been modified after the last build. In this case, the developer can launch a new build by clicking on the wrench icon.
Build running: The last build launched by the developer is still running.
Build completed: The last build has been completed and the service files are in sync with it.
3.4.9. Output files : Cloud Optimized geotiff (COG)
In order to ensure proper performance in visualization we recommend to execute the following lines of GDAL code to all raster data which your service generates as output files and that may be ingested into GeoServer or used in any other visualization or direct data access tool:
gdaladdo -r average  $PROC_DIR/input.tif
gdal_translate $PROC_DIR/input.tif \
               $OUT_DIR/cog/cog.tif \
               -co TILED=YES -co COMPRESS=JPEG -co COPY_SRC_OVERVIEWS=YES
3.5. Service templates specification
On the next screen, the user can start defining the service templates specification.
A service template specification is a partial version of a service specification. It includes the following subset of elements from service specification
The service metadata describe properties of the service (including its name, title, description, version and service type).
The Files tab allows the creation of the files that compose the service
The Input Definitions tab is used for the specification of the service inputs
The Output definitions tab is used for the specification of the service outputs
Please refer to the Service Specification page for a description of these elements.
4. Managing and Sharing
This section gives an overview of the functionalities available via the Manage/Share tab.
4.1. About Managing and Sharing
The figure below shows an overview of the Manage/Share tab:

Along the left of the screen there is a menu showing the various options available:
 Set up and control groups, i.e. different access lists. See Managing Groups
 Set up and control access to collections of data. See Managing Collections
 Control access to databaskets. See Managing Databaskets
 Control access to processing jobs and their outputs. See Managing Jobs
 Control access to systematic processings. See Managing Systematic Processings
Control access to services. See Managing Services
 Upload and control access to files. See Uploading and Managing Files
Shows the system messages to the user.
4.2. Managing Groups
The first step in controlling access is to set up a group, i.e. a set of users who will be granted access to data, service, etc.
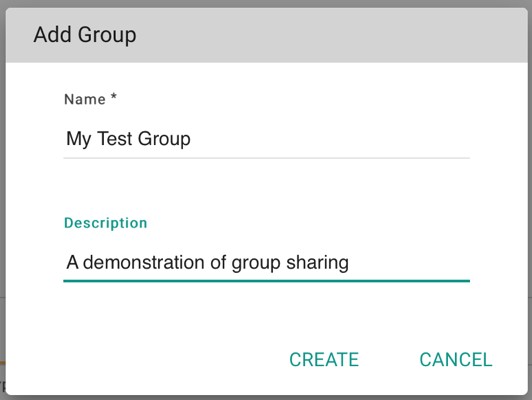
To set up a new group, select the item on the manage/share tab, then  .
This gives a popup window as shown below:
.
This gives a popup window as shown below:
Once the group has been created it will be shown on the manage/share interface:
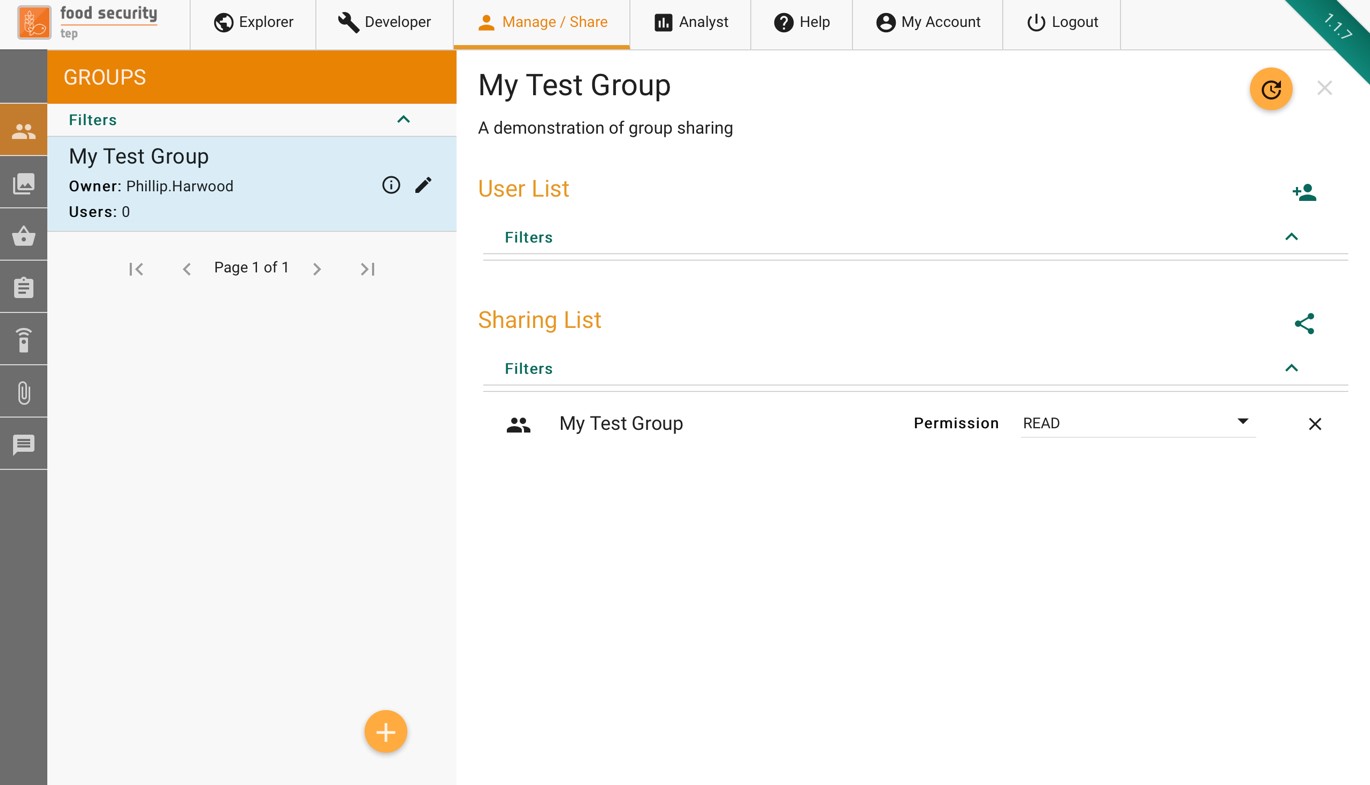
To add a new user to this group, press the  symbol, start typing the user name you want to add, then select the correct user from the popup list and press “ADD”.
Groups allow sharing of other things, including of groups themselves (e.g. to share the management of a group with a subset of the group as a whole).
To share a group, press the symbol then choose the group that you wish to share it with (usually but not always the same as the group you are sharing) and the level of access granted (read, write, admin).
4.3. Managing Collections
A collection is a set of data grouped together in order to ease searching and sharing.
To create a new collection, select the item in the manage/share interface, then .
This gives a popup window as shown below:
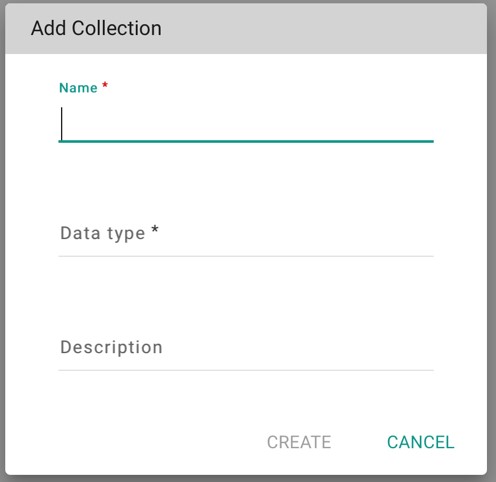
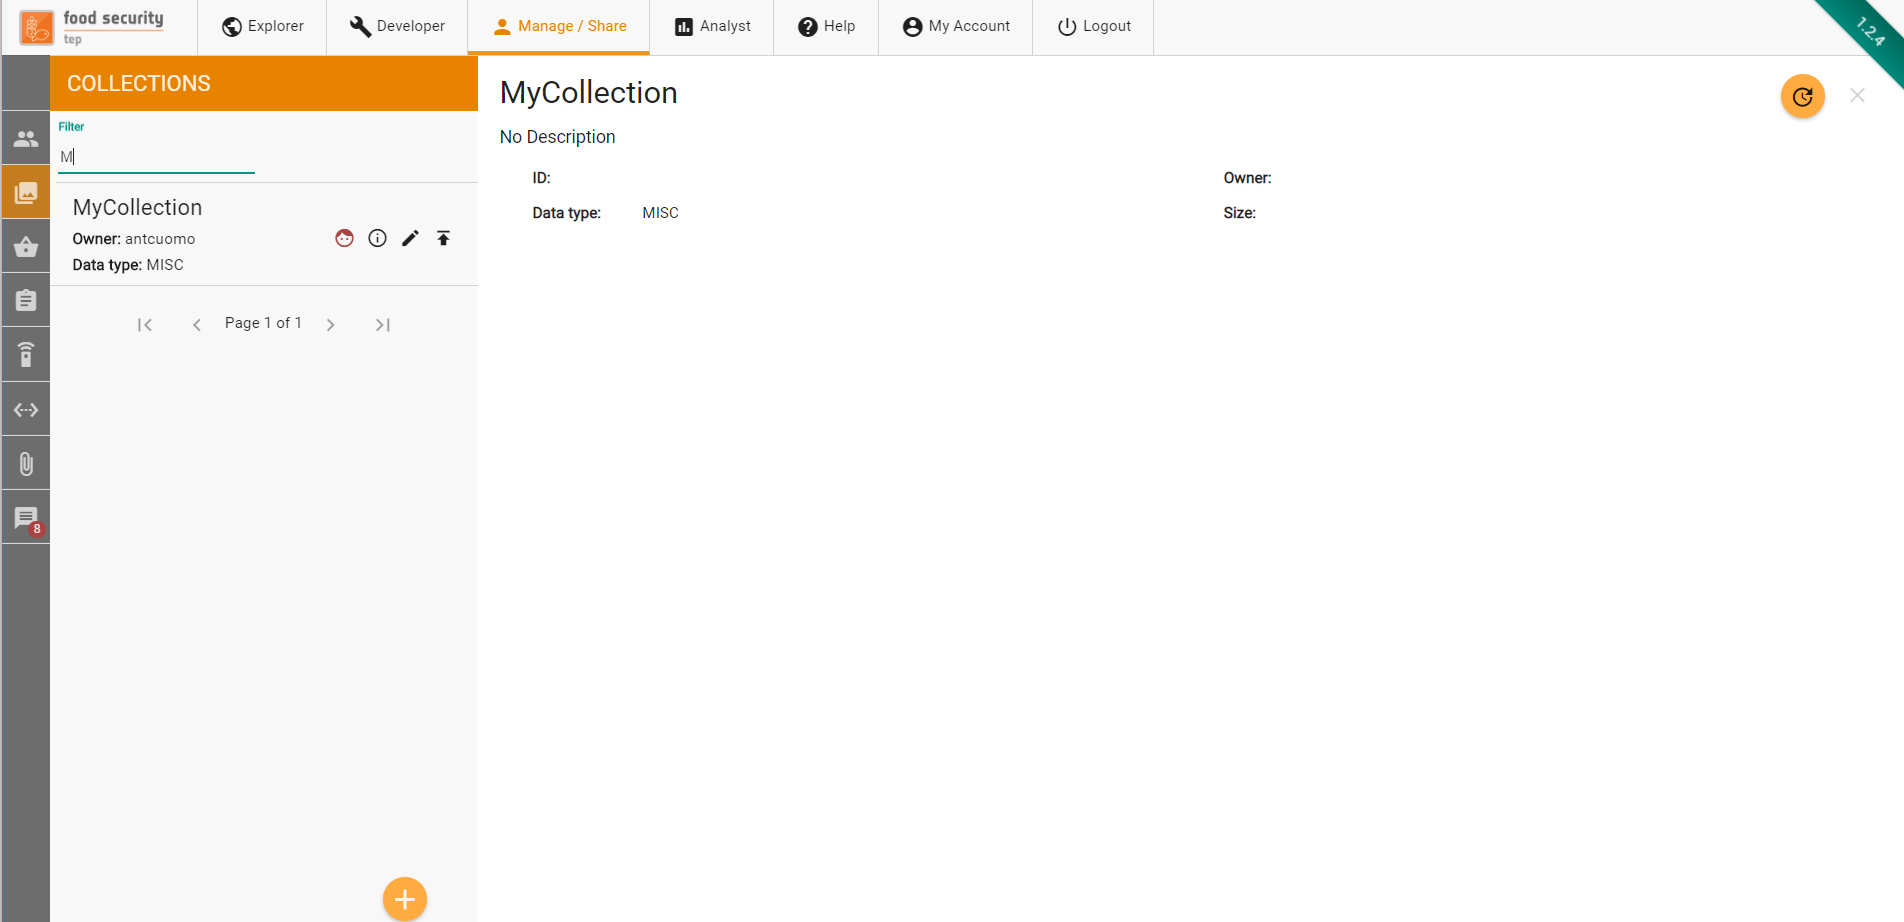
Once created this collection appears in the manage/share tab as shown below:
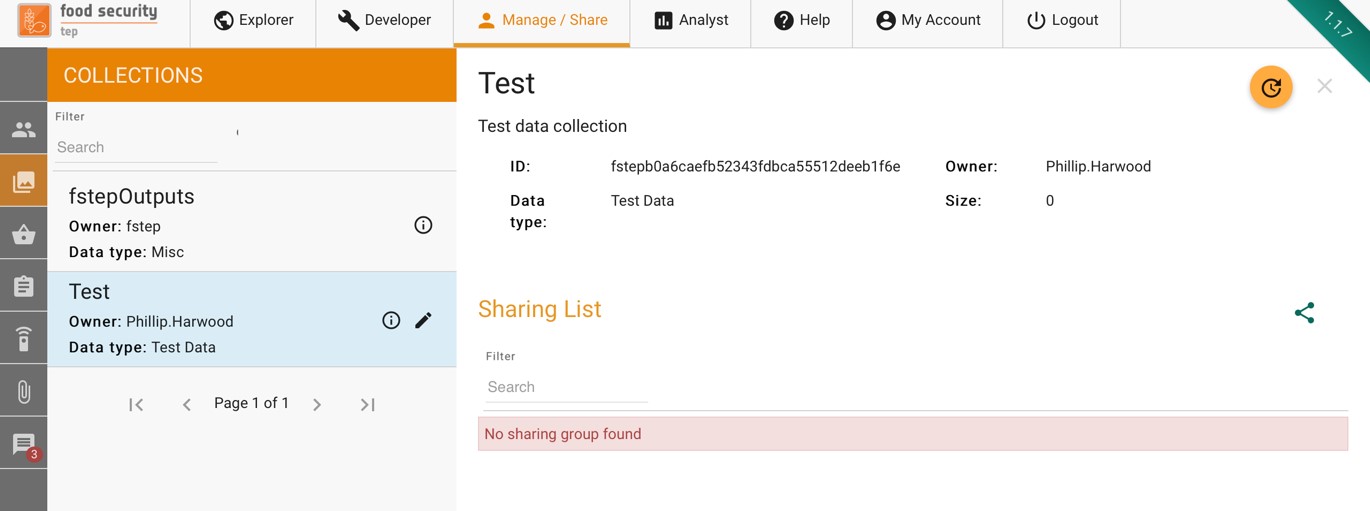
To share a collection, press the symbol then choose the group that you wish to share it with and the level of access granted (read, write, admin).
4.4. Managing Databaskets
Databaskets are used to group search results together to facilitate sharing and bulk processing. They have already been discussed in section 2.3. Databaskets can also be added and edited from the manage/share interface.
To create a new collection, select the item in the manage/share interface, then . This gives a popup window to add the name and description.
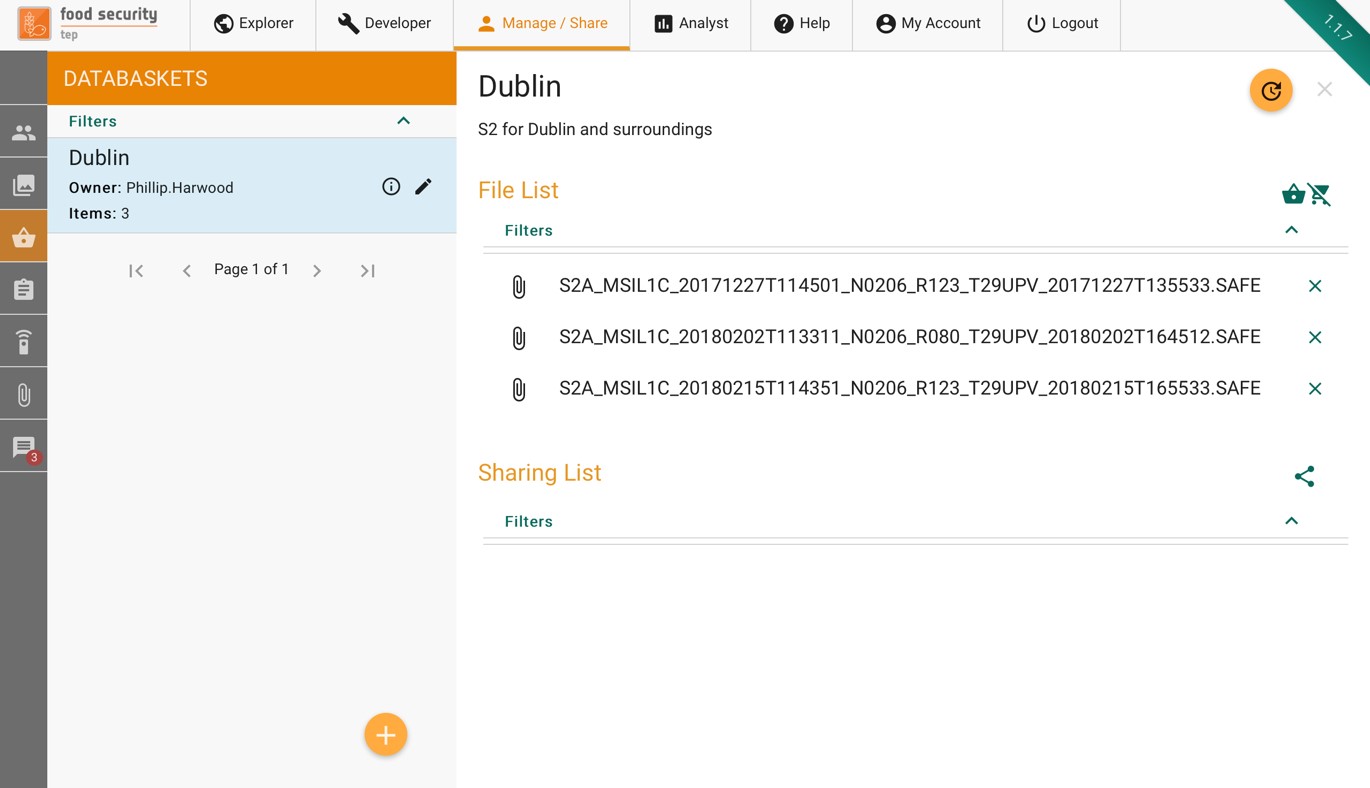
Once created, a databasket appears in the manage/share interface as shown below. The user can:
Add or clear individual files from the databasket
Share the databasked with a group. To share, press the
symbol then choose the group that you wish to share it with and the level of access granted (read, write, admin).
4.5. Managing Jobs
Clicking on the item in the manage/share interface will show the user’s processing jobs, as shown below.
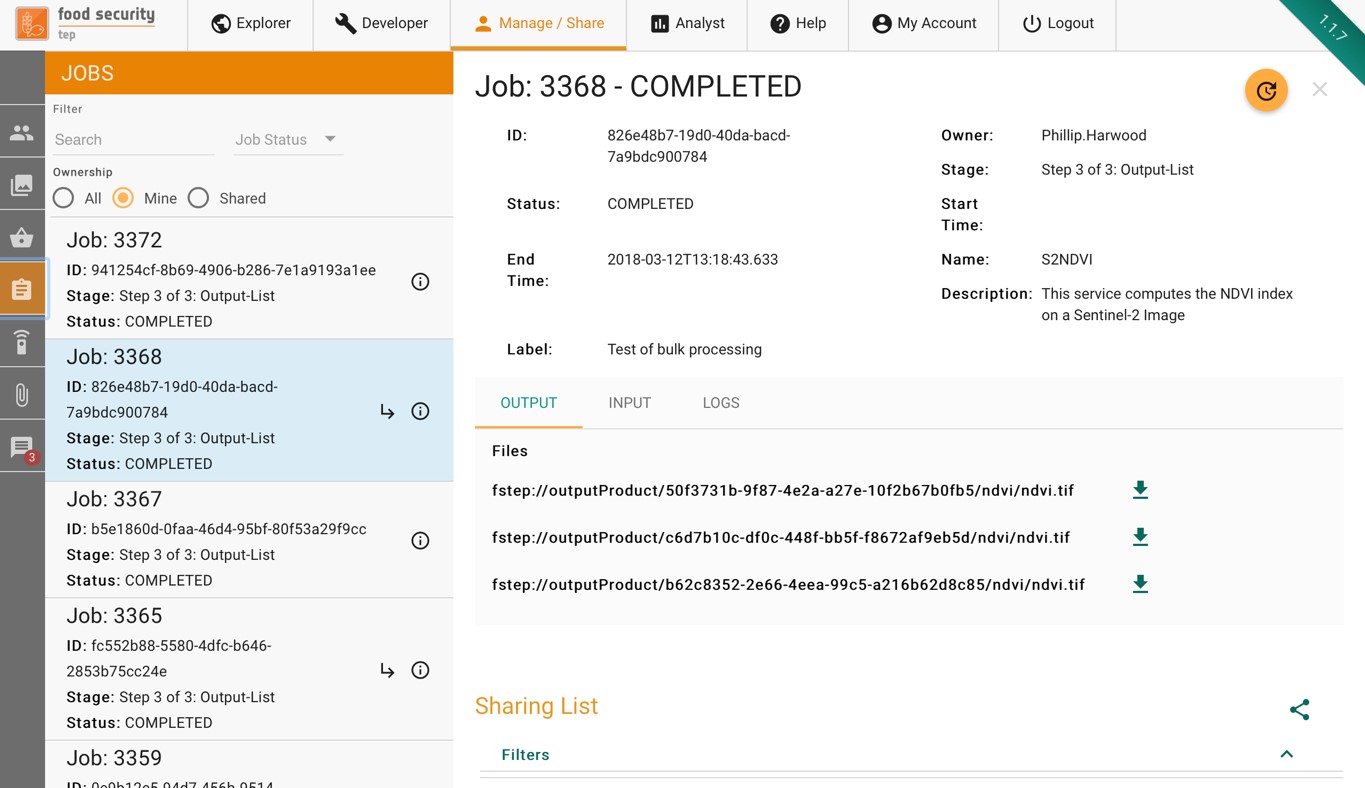
To share the job and its output, press the symbol then choose the group that you wish to share it with and the level of access granted (read, write, admin).
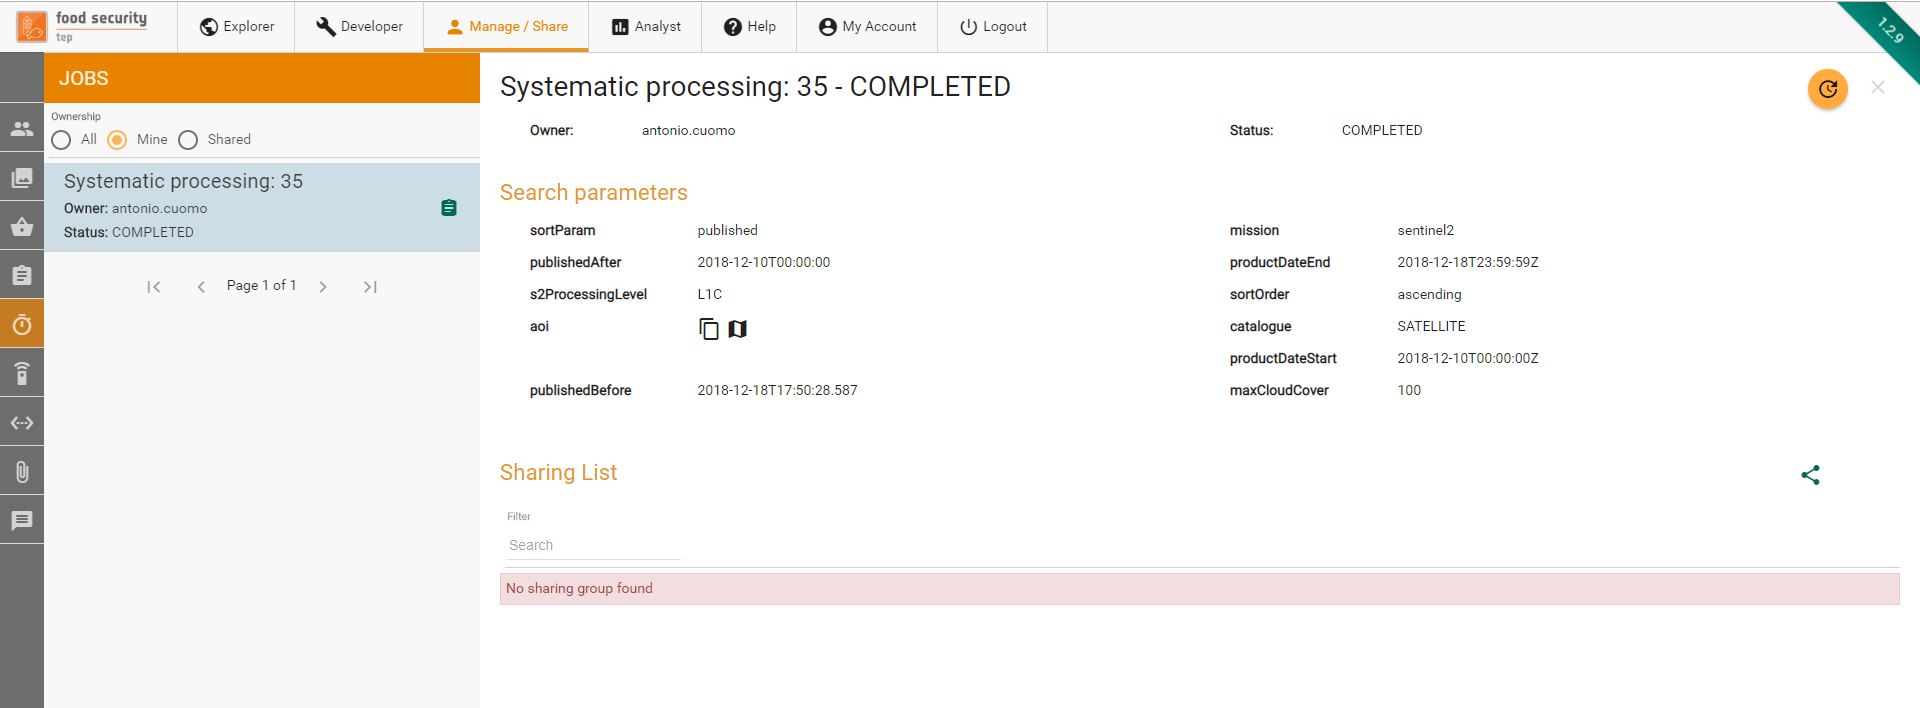
4.6. Managing Systematic Processings
Clicking on the item in the manage/share interface will show the user’s systematic processings, as shown below.
4.7. Managing Services
Clicking on the item in the manage/share interface will show will show a list of services available to the user, including their own:
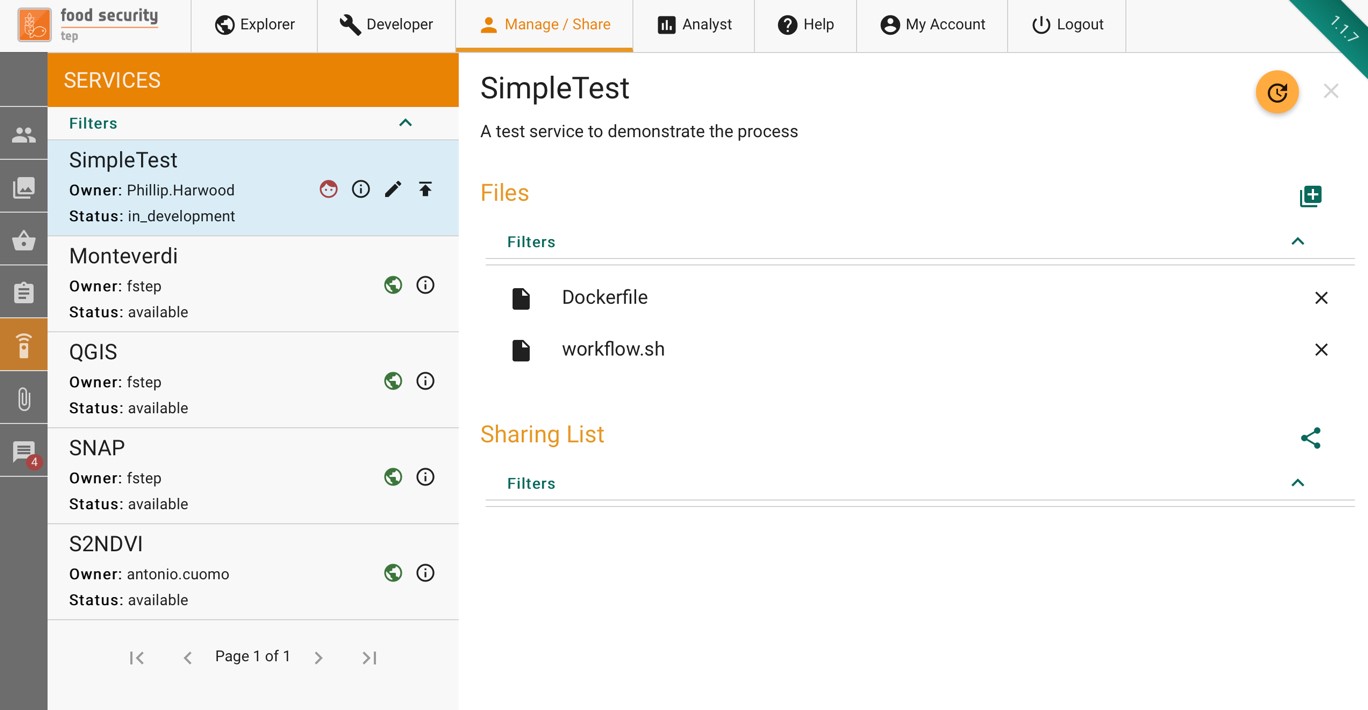
For advanced users who have write or admin access to a service, this tab will show the files which comprise the service.
To share a service, press the symbol then choose the group that you wish to share it with and the level of access granted (read, write, admin).
4.8. Uploading and Managing Files
Clicking on the item in the manage/share interface will show a list of the users files. New files can be added by selecting the button to get a popup as shown below.
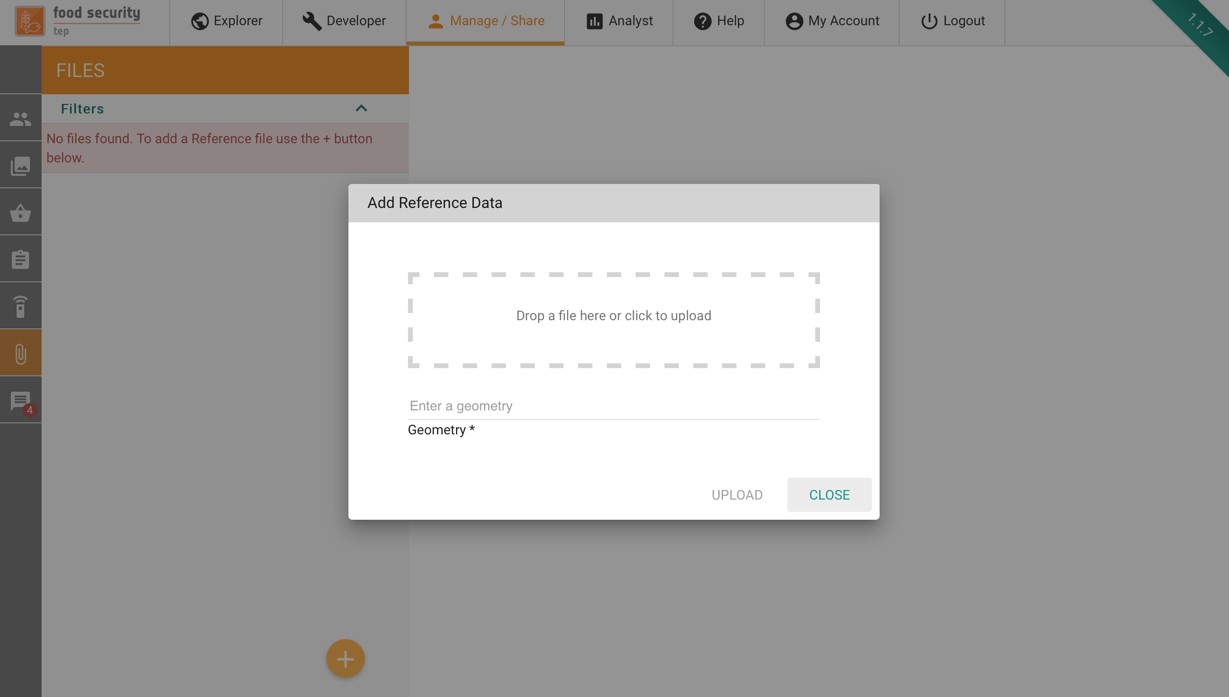
User can upload GeoTiff, Shapefiles or other files.
For GeoTiff, the geometry is automatically extracted from the file and inserted in the platform metadata catalogue.
For Shapefiles, the geometry is automatically extracted from the file and inserted in the platform metadata catalogue.
Shapefiles should be uploaded as a zip archive including at least the .shp, .shx, .dbf and .prj files.
If the resulting geometry has less than 10.000 points, it is preserved as it is, otherwise only the bounding box is saved (in the metadata catalogue, the original file is preserved as it is in storage).
For other files, a WKT geometry can be optionally specified.
For all these tipologies, users can optionally specify a description and start/end dates of the data inside the file. All these data will be saved as file metadata.
Once uploaded, to share a file press the symbol then choose the group that you wish to share it with and the level of access granted (read, write, admin).
4.9. Publication Requests
Publication Requests allow to submit a request to the Platform Content Authority to make publicly available some content.
Currently, publication requests can be submitted for the following artifacts:
Services
Service Templates
Collections
The publication request can be submitted by clicking on the up arrow in the Manage/Share section for the corresponding artifact ( see screenshot below for an example of the collection request button)
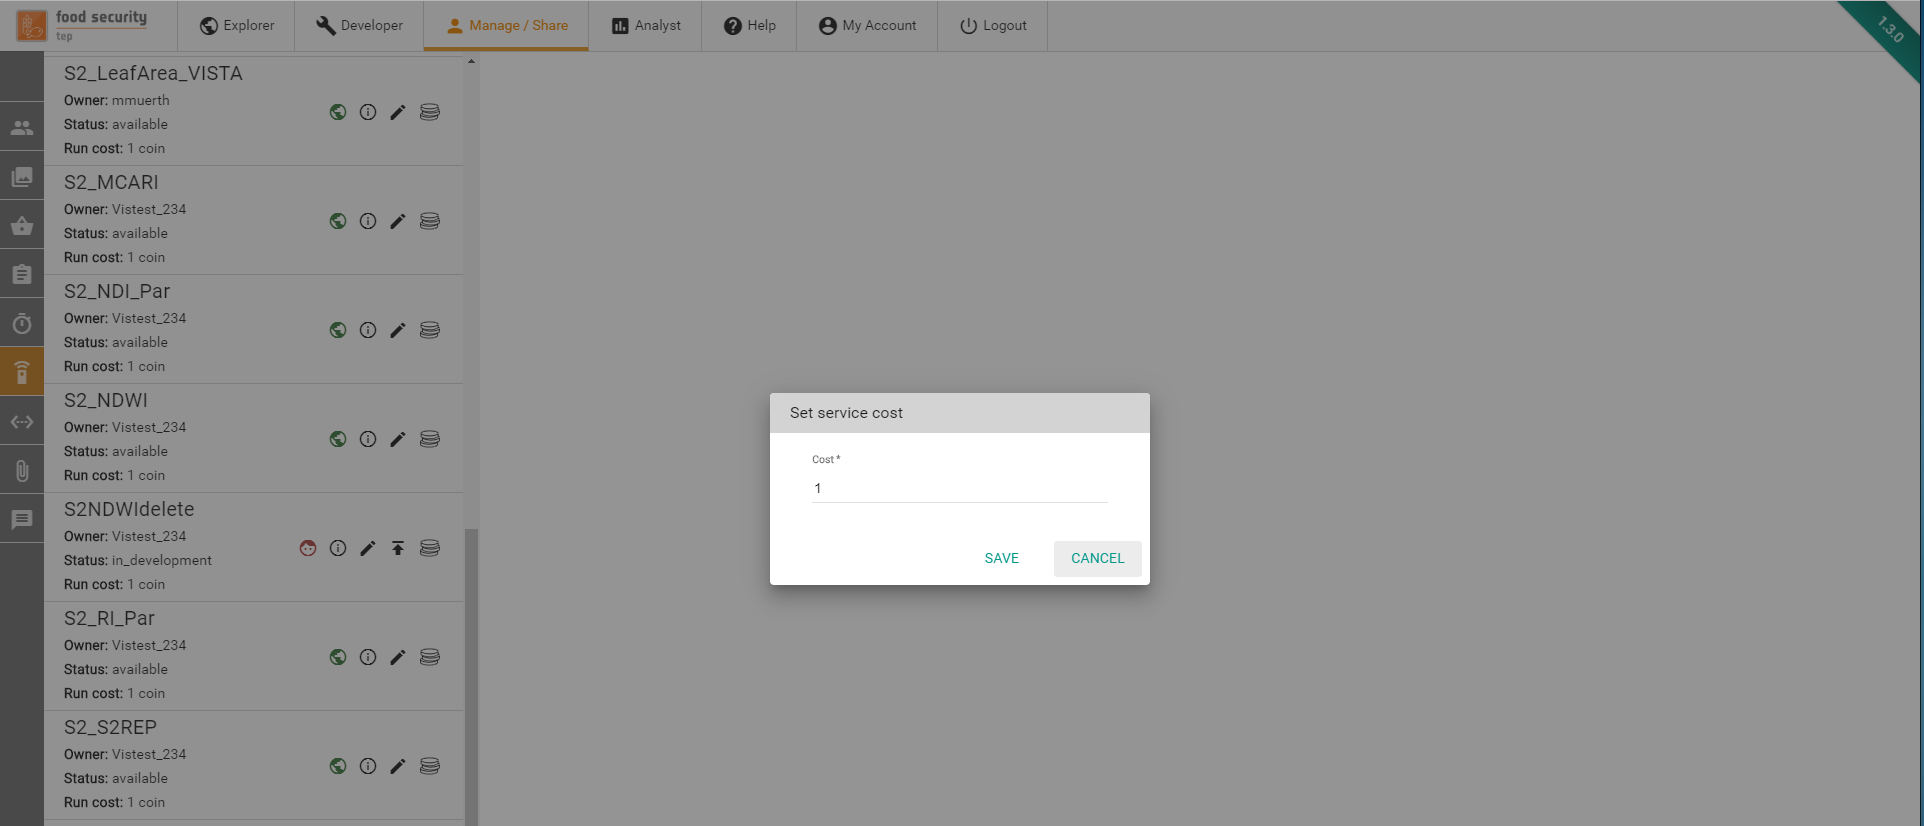
4.10. Managing resource costs
The Content Authority can set the cost of services and collections.
The cost of the resource can be changed by clicking on the  icon in the Manage/Share section for the corresponding artifact (see screenshot below for an example of the service cost button)
5. Analyst View
5.1. About the Analyst View
Selecting the “Analyst” tab on the FS TEP portal will open up the analyst view in a new browser tab. The analyst view can also be accessed directly at
https://foodsecurity-tep.net/analyst/
This view allows users to browse and view selected output product sets in an easy to use and mobile compatible interface, without the need to have sharing rights or TEP coins. However downloading products from this view is not permitted.
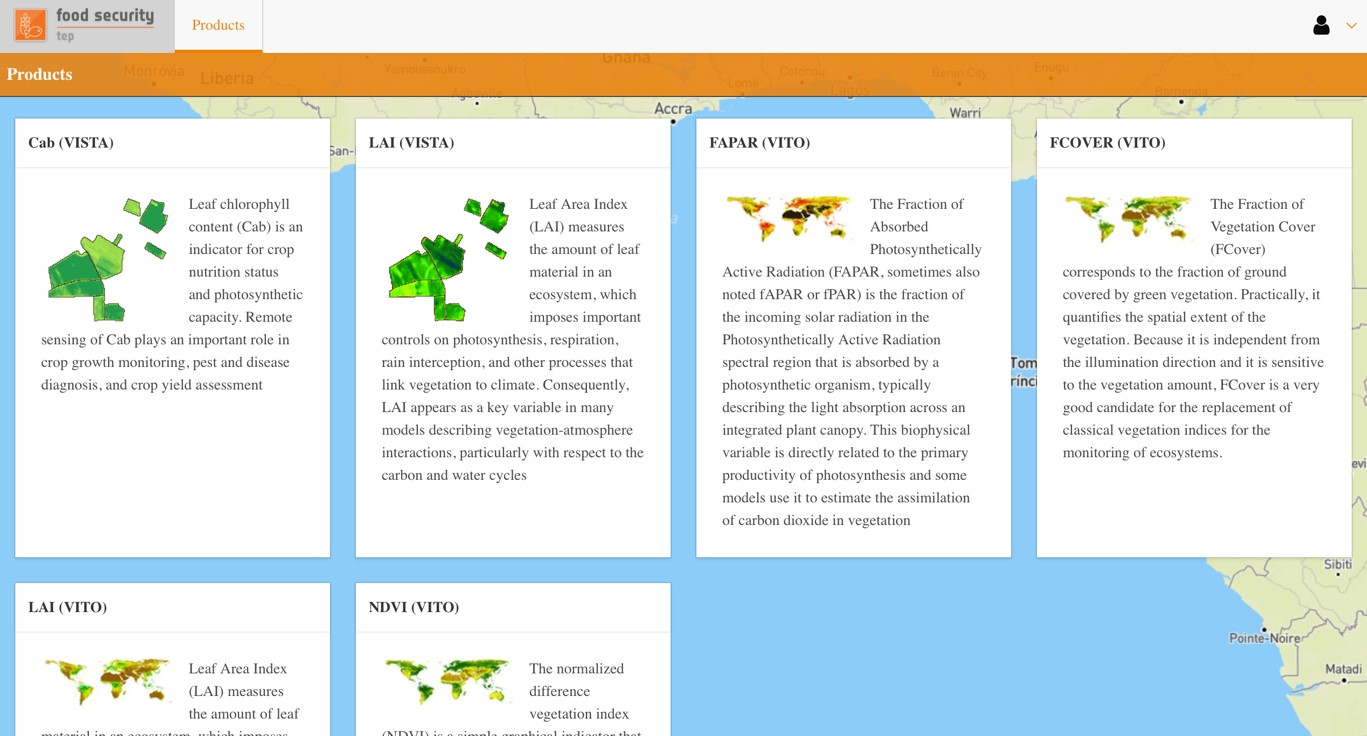
5.2. Using the Analyst View
Click on “Products” to see a list of available data products, together with short descriptions.
Selecting a product will automatically open the most recent date for this product, and will zoom in to the appropriate area of interest.
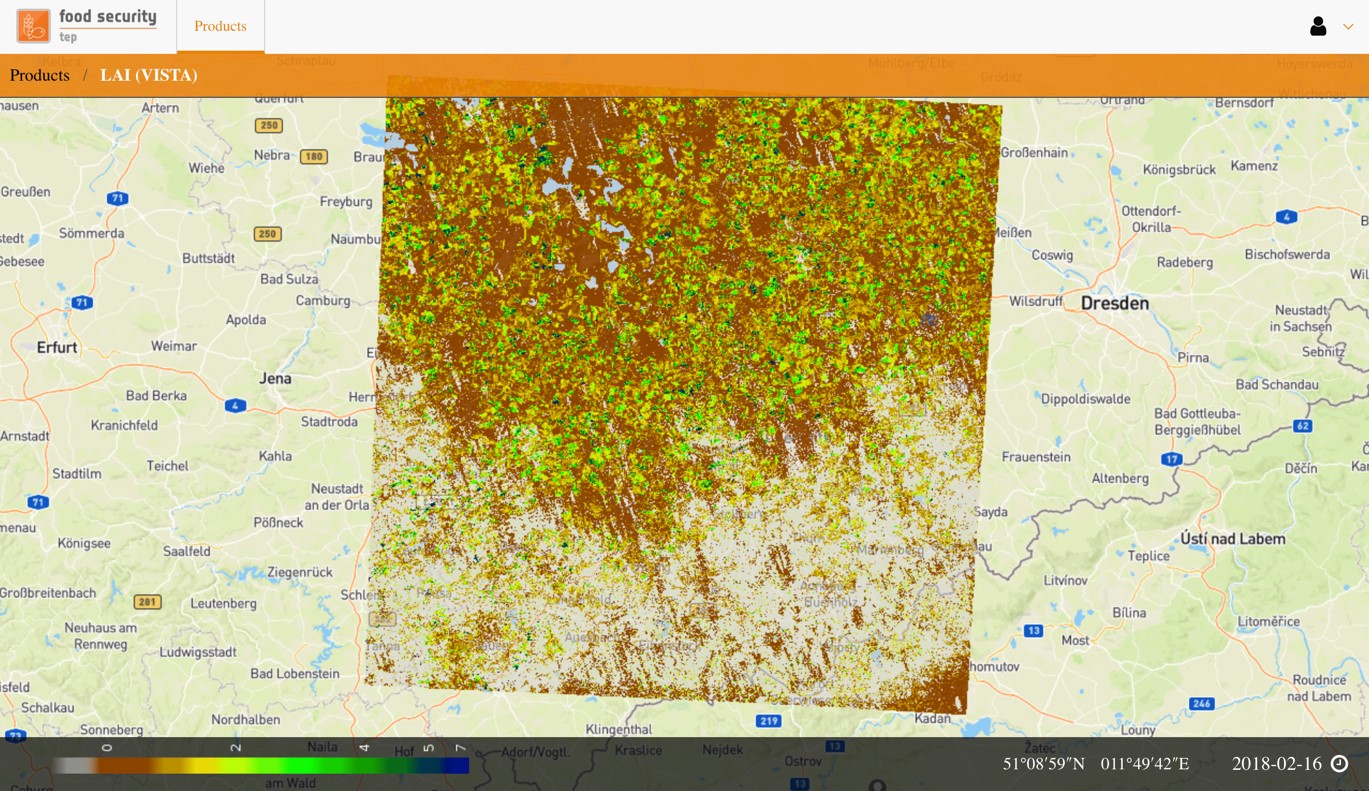
To navigate the product:
Zoom in by double clicking or scrolling the mounse
Zoom out by pressing shift and double clicking
To view the product for a different date, click on the date shown in the bottom right to get a pop up calendar.
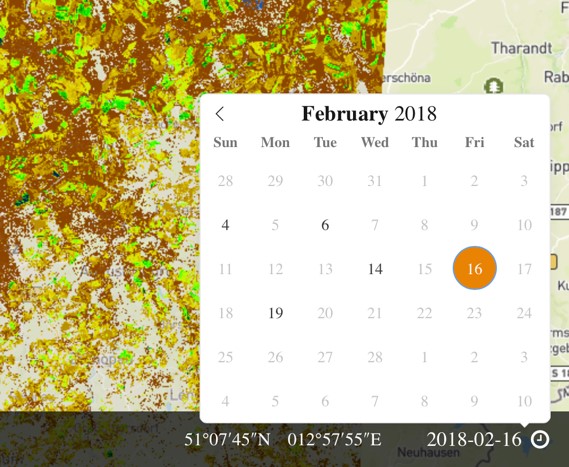
Dates where data are present are shown in black, dates without data are in grey.
Clicking on any point will show a pop up giving the latitude and longitude of the point, and the value of the product on the selected date.
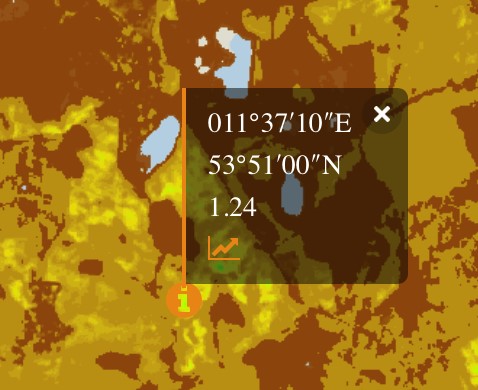
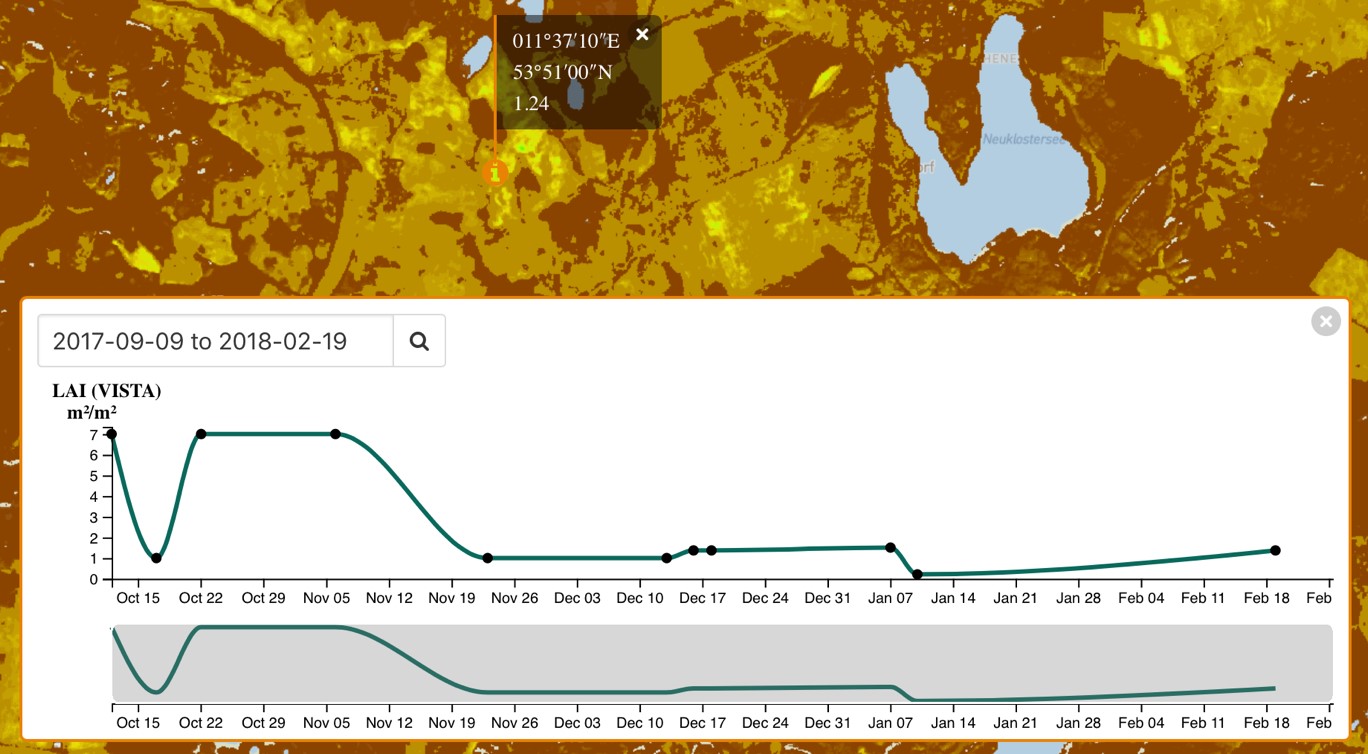
Clicking on the graph symbol shows a time series for the product for the available dates, with dots showing when data are available and a line interpolating these data points.
6. The FS TEP API
6.1. About the FS TEP API
FS TEP exposes a REST API that allows users to programmatically access the functionalities of the Platform.
Usage of the API is restricted to non administrative users (with roles USER or EXPERT_USER)
6.2. Obtaining an API Key
The API Key management functions can be accessed through the “My Account” page of the FS TEP Main Platform Interface.
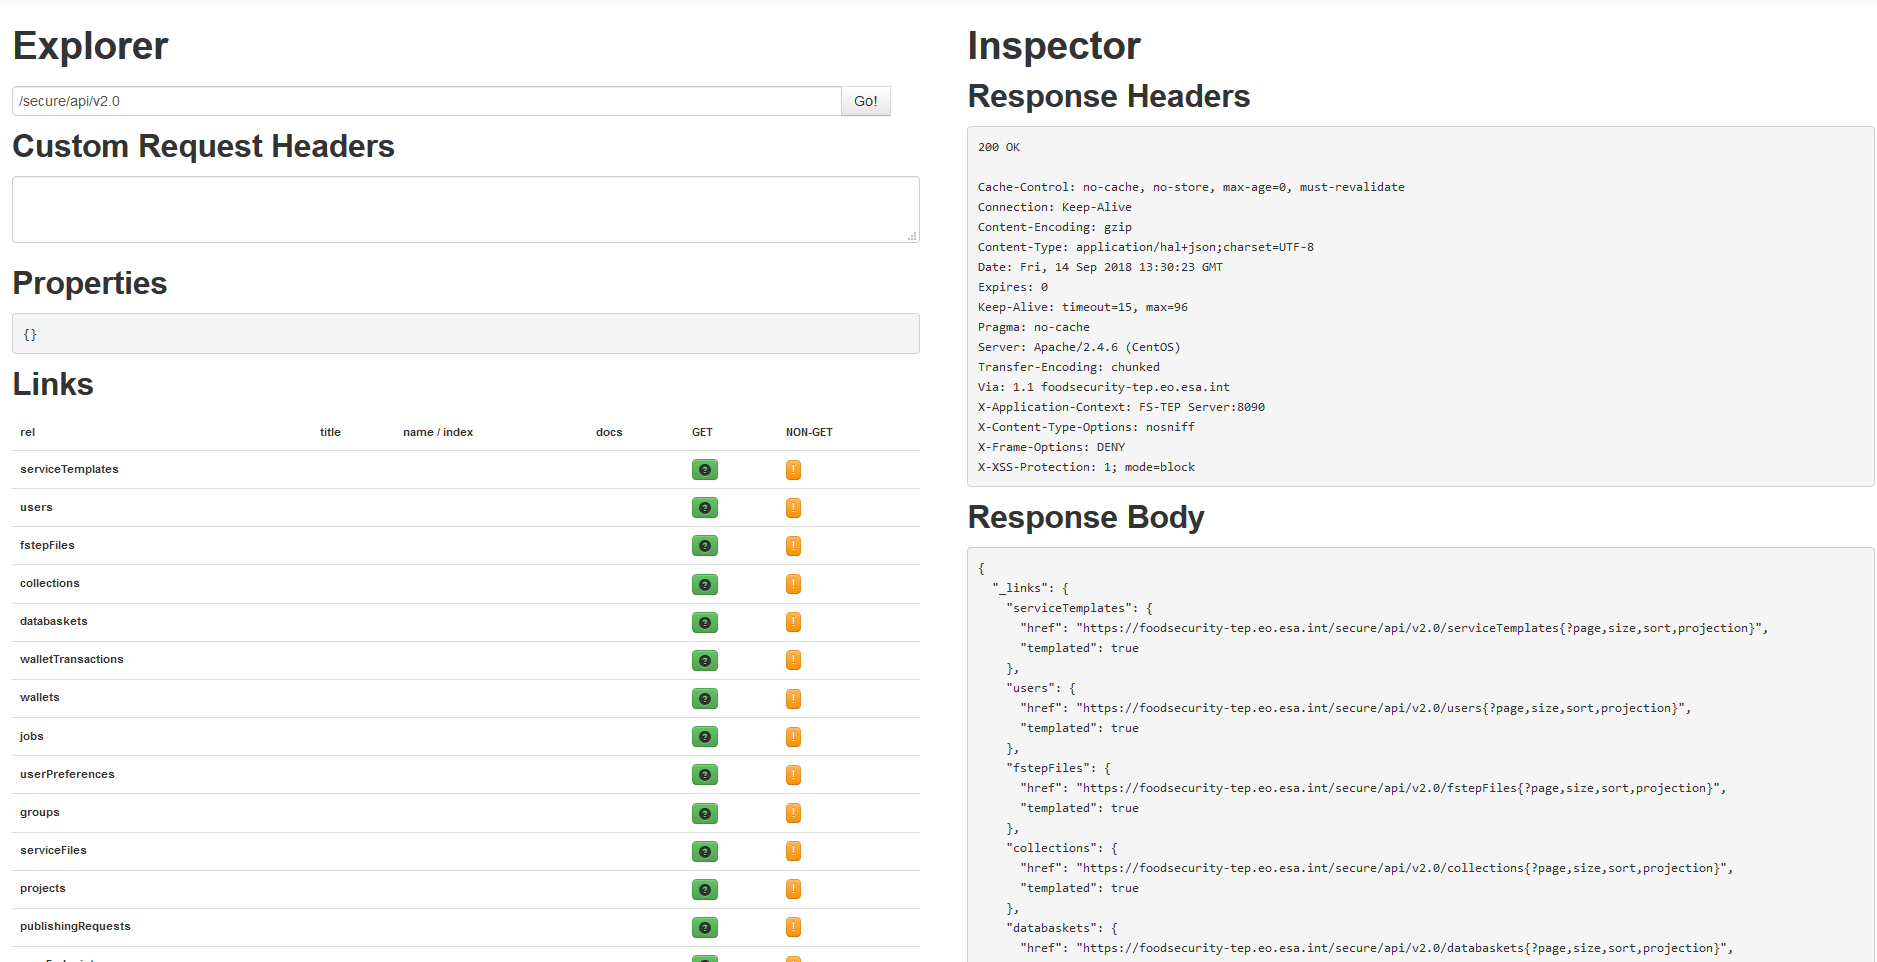
6.3. Online API documentation
The available API functions are visible in the HAL Browser accessible at https://foodsecurity-tep.net/secure/api/v2.0/
6.4. Using the API
The FS TEP API endpoint is https://foodsecurity-tep.net/secure/api/v2.0
To make a call to an API resource, a Basic Authorization Header must be provided containing the API key. This header has the canonical form
“Authorization: Basic <base64 encoded username:apikey>”
Example: Get a list of the user jobs
The following curl command will return a JSON description of the processing jobs visible by the user:
curl -H “Authorization: Basic <base64 encoded username:apikey>” https://foodsecurity-tep.net/secure/api/v2.0/jobs
7. My Account
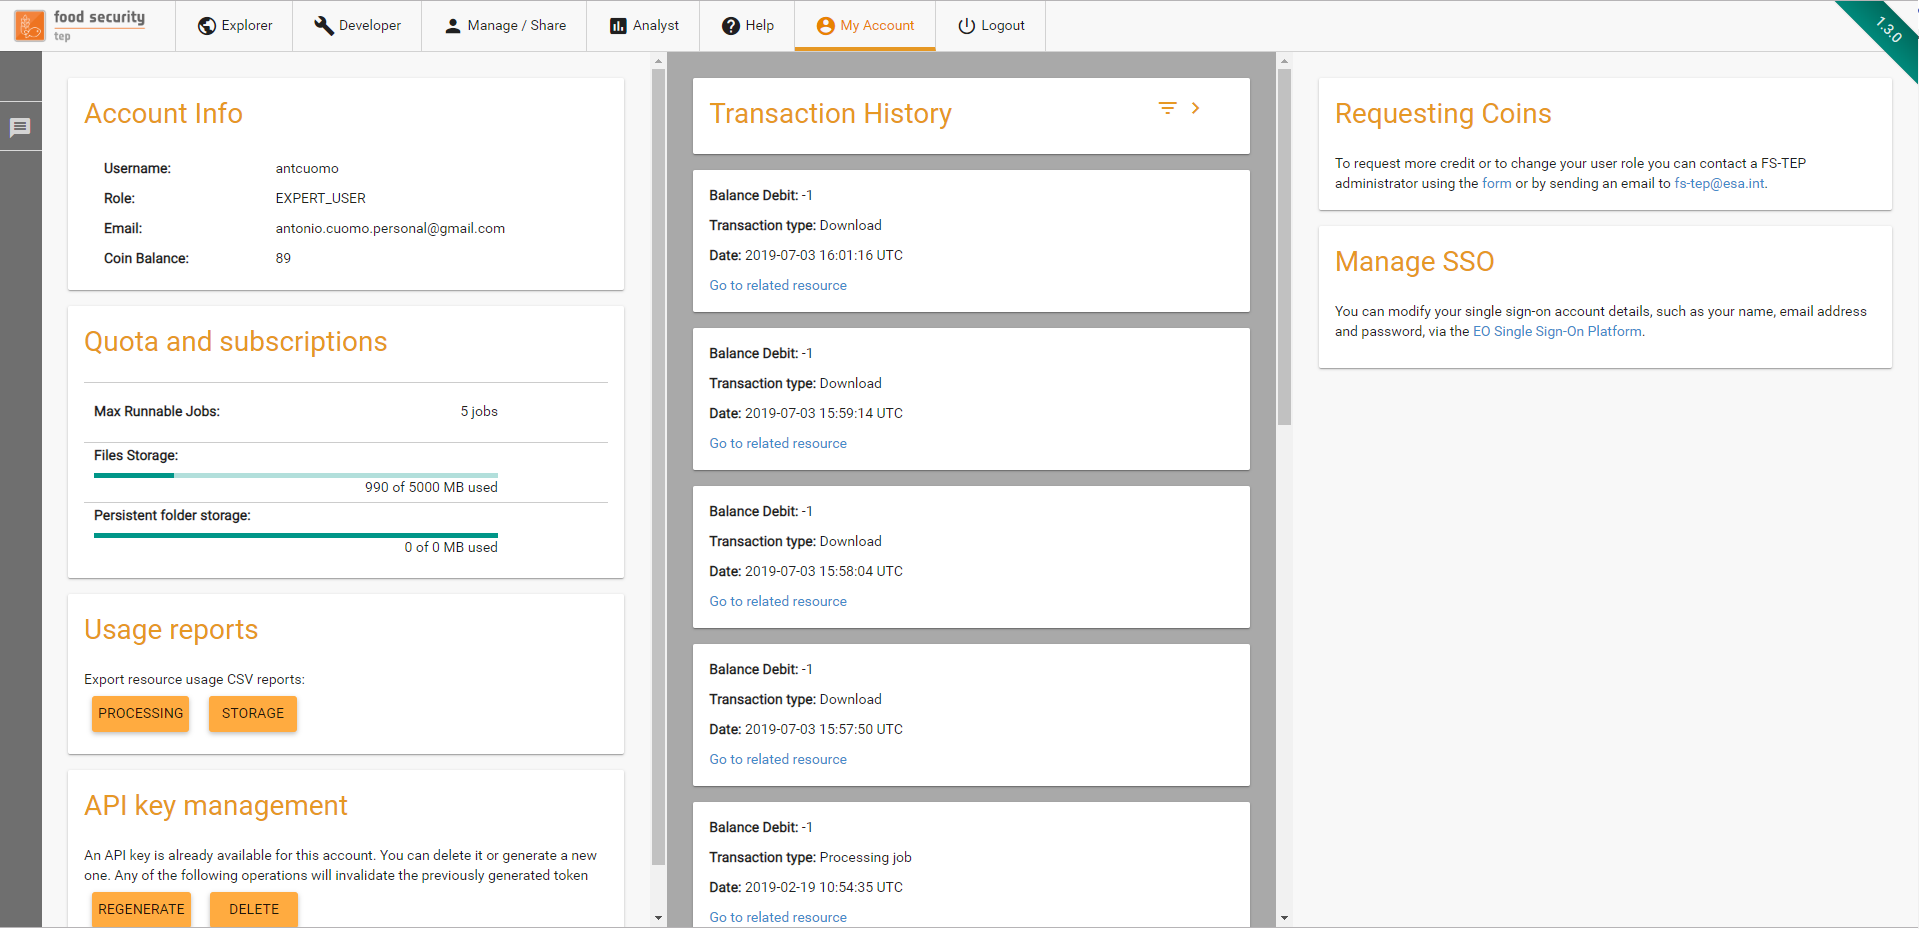
7.1. The “My Account” tab
The “My Account” tab provides the user with the following information
The username (and associated email) used to access the site.
The user’s role (basic user, expert user, administrator, etc)
A link to the account management of the EO SSO account
The current balance of TEP coins, and a link to where more can be requested.
The transaction history, showing the TEP coin usage over time, which can be filtered by the type of transaction and the date
The Quota and Subscriptions panel
The Usage Reports panel
The API key management panel
7.2. Use of TEP Coins
Although users may freely browse data and outputs on the site, to run a process or to download data requires them to have a sufficient TEP coin allocation.
At the current stage of the FS TEP project, TEP coins are not used for billing but as a means to enforce a fair-use policy. Coins may be requested at any time by emailing the project’s helpdesk at fs-tep@esa.int.
Users will be initially assigned a small number of coins to allow them to investigate the system, then if the user requires more coins (e.g. to do a batch processing) this will be agreed with the project on a case by case basis.
7.3. API Key Management
Under API key management, users can
Generate an API Key for the first time
Delete an existing API Key
Regenerate an existing API Key (effectively replacing the previous one)
For security reasons, when a key is generates, it is shown only once to the user to take note of it.
7.4. Quota And Subscriptions
Under Quota and Subscriptions, users can check their usage/limits for different kind of resources and subscribe
7.4.1. Usage and limits
Currently, the platform manages quota for the following resources:
Max runnable jobs: This determines the number of user jobs that are allowed to be processed in parallel in the platform. Jobs exceeding this quota will need to wait until other jobs from the same user terminate.
Files storage: This limits the cumulative size of files that user can store on the platform, either as result of job processing activities or as reference data.
Persistent folder storage: This determines the maximum size of the persistent folder that user can make use of in processing activities.
7.4.2. Subscriptions
For each quota element for which there at least a subscription plan available, the platform will display a subscription plan button. By clicking on this button, the subscription panel will open.
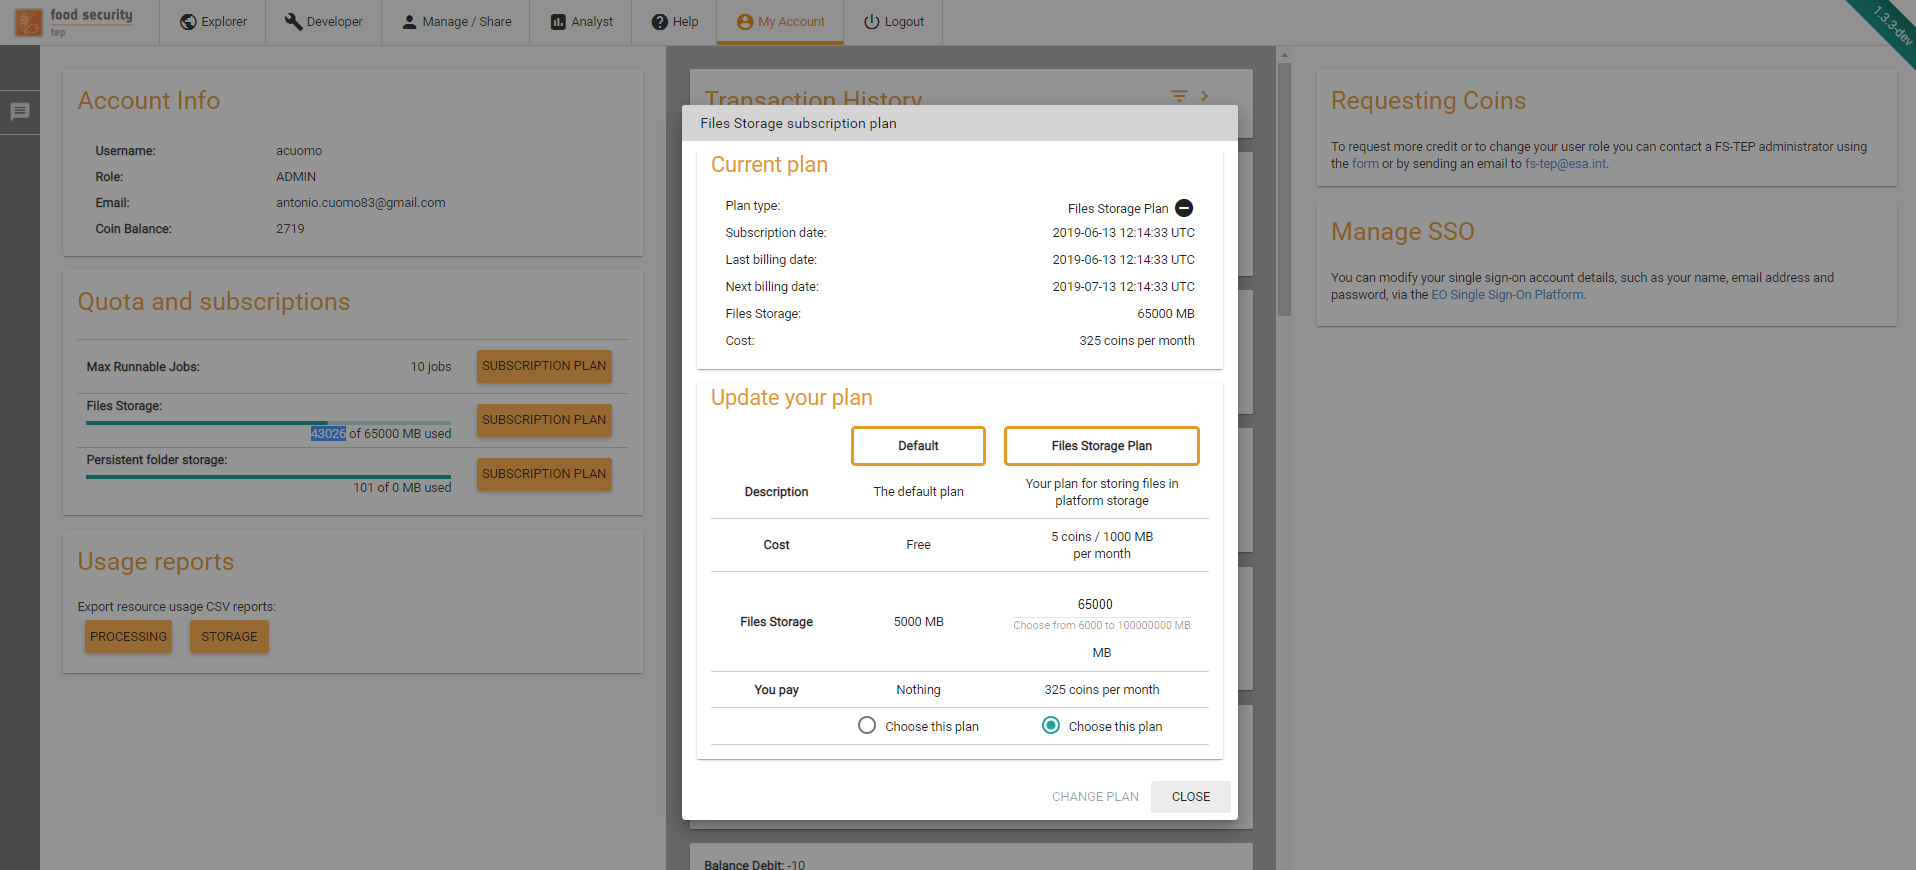
In this panel, user are able to create a new subscription, disable the automatic renewal of existing subscriptions or change their subscriptions quantity/plan.
In case of a subscription downgrade, the changes will be applied at the end of the current billing period.
In case of a subscription upgrade, the changes will be applied immediately and the platform will only charge the difference between the old subscription cost and the new subscription cost for the rest of the subscription period.
Note: Subscription plans have not yet been published to the operational platform, so this feature is currently not visible in that environment.
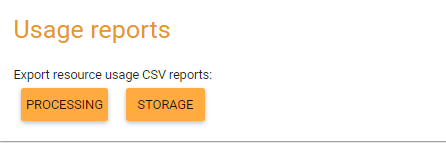
7.5. Usage Reports
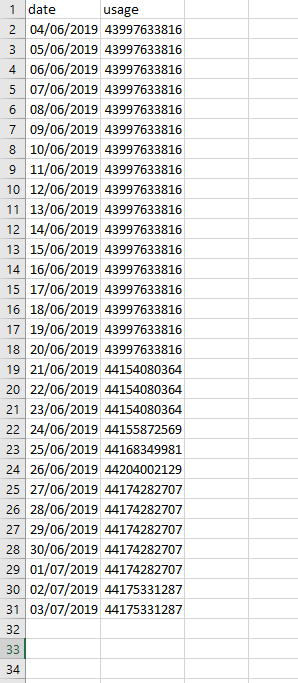
With these controls, user can request to download CSV reports of their platform usage. Two different reports are currently provided: processing and storage usage. Each report can be generated for a maximum of 1 month.
A sample of storage usage report is provided in the following image, as opened in Microsoft Excel.
8. Frequently Asked Questions
How do I obtain an SSO account?
Instructions can be found at https://earth.esa.int/web/guest/general-registration.
How do I obtain TEP Coins?
Contact the FS TEP team at https://foodsecurity-tep.net/content/contact.
How can i obtain a persistent folder to be used in my processing activities?
Contact the FS TEP team at support@foodsecurity-tep.net.
9. Known issues
SAML Binding Exception when signing in
This error is intermittent - Go back to the homepage and try logging in again.
10. Changelog
V1.3.0:
Added section Persistent folders
Updated Frequently Asked Questions
Added section Managing resource costs
Added section Quota And Subscriptions
Added section Usage Reports
Fixed minor issues